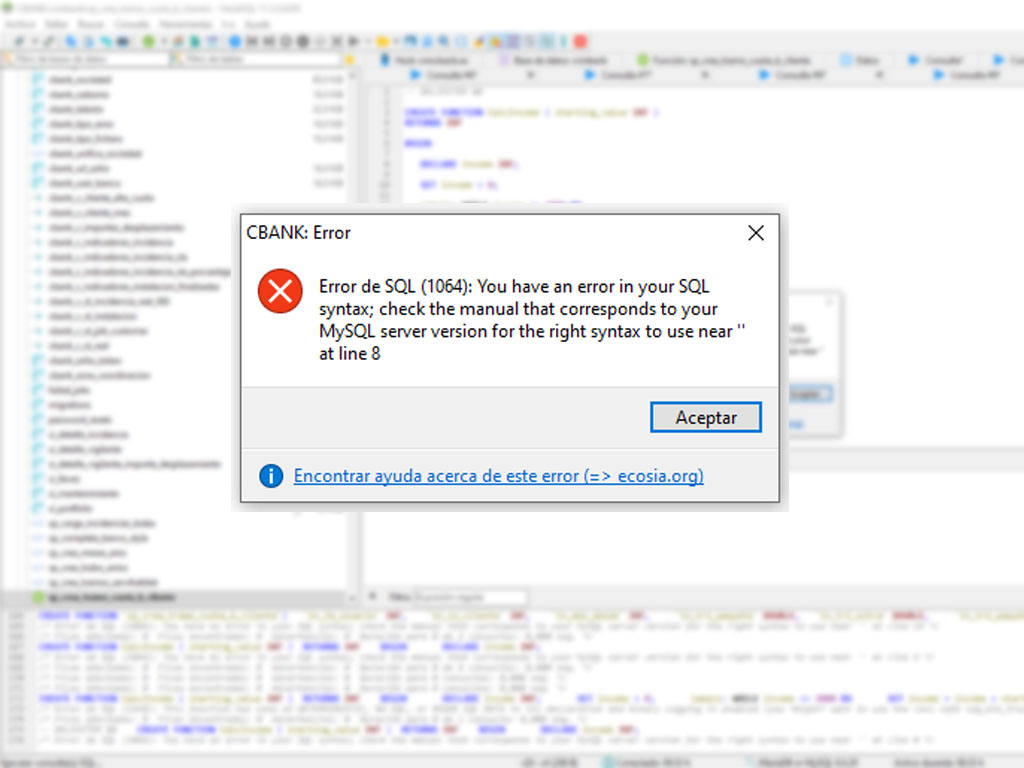
No matter how simple you define your function, its creation will fail when using HeidiSQL interface.
CREATE FUNCTION `fn_my_function`(
    `parameter_a` INT
)
RETURNS INT
LANGUAGE SQL
DETERMINISTIC
CONTAINS SQL
SQL SECURITY DEFINER
COMMENT ''
BEGIN
   return 0;
END
After reviewing your code, you can’t find any syntax error. You try to fix it by removing the COMMENT ” line, but nothing seems to work.
The solution is quite simple:
Tell the SQL engine a new DELIMITER:
DELIMITER //
After the END; line, add another one to restore the DELIMITER to ;
DELIMITER ;
That’s all
DELIMITER //

CREATE FUNCTION `fn_my_function`(
    `parameter_a` INT
)
RETURNS INT
LANGUAGE SQL
DETERMINISTIC
CONTAINS SQL
SQL SECURITY DEFINER
COMMENT ''
BEGIN
   return 0;
END

DELIMITER ;
Please note that there is a space separator between DELIMITER and ;
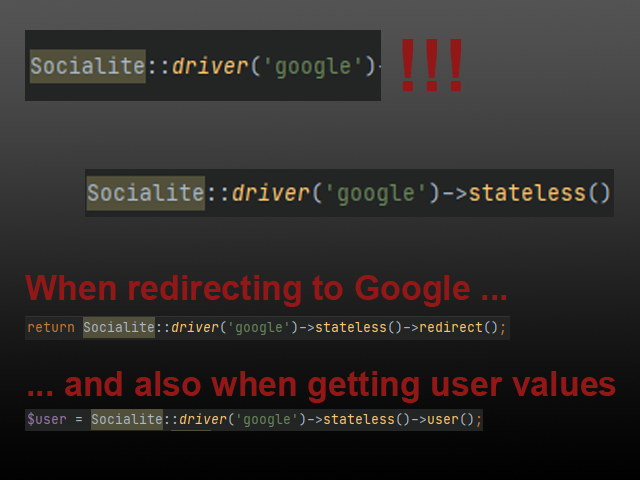
After struggling for three hours, and making a useless bunch of changes in my code and server configuration, I finally found the solution to this:
When you finish your coding, and test it in your localhost deployment, you can login using Google and there’s no problem in getting all the user profile information.
Then you deploy the application in your cloud server environment and a “no message” error appears and doesn’t allow you to log into your application.
Laravel Socialite Google Login Error with No Message
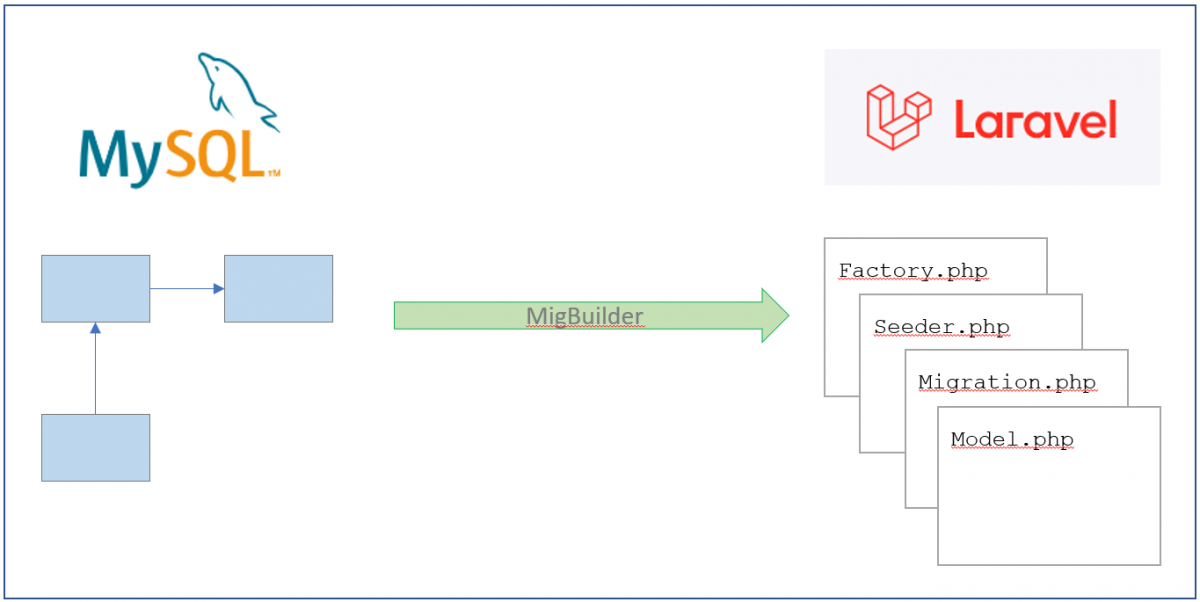
MigBuilder is a tool to reverse engineer a MySQL database into Models, Factories, Seeders & Migrations files for Laravel Eloquent ORM.
MigBuilder is a tool to reverse engineer a MySQL database into Models, Factories, Seeders & Migrations files for Laravel Eloquent ORM.
It reads the database structure and completes as much code as possible to ease the model generation in Laravel.
Unless the model is structured exactly as expected, the code files will contain non accurate lines or declarations. So it is ALWAYS recommended to check the code once is generated.
The ‘perfect’ tables definition is:
Tables should contain a single column primary key, better if its name is ‘id’
Relationships have to be declared and always be composed of one single column
Not frequent datatypes (binary, longtext, …) have not been tested yet
INSTALLATION
composer require pangodream/migbuilder
USAGE
php artisan migbuilder originschema
Migbuilder will read originschema database (originschema is the connection name in Laravel config/app.php file) and will generate the migration, model, seeder and factory files for each of the tables A good practice is two have two different connections declared in Laravel config/database.php file:
One alternative connection pointing to the existing database to be reverse engineered
The main connection that will be used to deploy migrate files and use models in
CAUTION: If you use the command above and any of the generated files already exists, the generation will not begin unless you specify the overwrite (–overwrite) parameter. Notice that using overwrite will destroy the information you have in any of your files having the same name.
NOTE: Migbuilder is not an error free code generator, but a help to save hand code lines, so you should review the generated code in every case.
I hope it to help you and if you have any comment, please let me know.
Sample generated files:
Source DDL
CREATE TABLE product (
id INT(11) NOT NULL,
name VARCHAR(45) NOT NULL DEFAULT '',
slug VARCHAR(45) NOT NULL DEFAULT '',
description VARCHAR(45) NOT NULL DEFAULT '',
price VARCHAR(45) NOT NULL DEFAULT '',
subcategory_id INT(11) NOT NULL DEFAULT '0',
brand_id INT(11) NOT NULL DEFAULT '0',
quantity VARCHAR(45) NOT NULL DEFAULT '0',
PRIMARY KEY (id),
INDEX FK_products_subcategories (subcategory_id),
INDEX FK_products_brands (brand_id),
CONSTRAINT FK_products_brands FOREIGN KEY (brand_id) REFERENCES brand (id),
CONSTRAINT FK_products_subcategories FOREIGN KEY (subcategory_id) REFERENCES subcategory (id)
)
COLLATE='utf8_general_ci'
ENGINE=InnoDB;
Migration file
<?php
/* Generated automatically using MigBuilder by Pangodream */

use Illuminate\Database\Migrations\Migration;
use Illuminate\Database\Schema\Blueprint;
use Illuminate\Support\Facades\Schema;

class CreateProductTable extends Migration
{

    /**
     * Run the migrations.
     *
     * @return void
     */
    public function up()
    {
        Schema::create('product', function (Blueprint $table) {
            $table->id('id');
            $table->string('name', 45)->default('');
            $table->string('slug', 45)->default('');
            $table->string('description', 45)->default('');
            $table->string('price', 45)->default('');
            $table->unsignedBigInteger('subcategory_id')->default(0);
            $table->unsignedBigInteger('brand_id')->default(0);
            $table->string('quantity', 45)->default('0');
            $table->timestamps();

            // Indexes
            $table->index('id');

            // Constraints & Foreign Keys
            $table->foreign('subcategory_id')->references('id')->on('subcategory');
            $table->foreign('brand_id')->references('id')->on('brand');
        });
    }

    /**
     * Reverse the migrations.
     *
     * @return void
     */
    public function down()
    {
        Schema::disableForeignKeyConstraints();
        Schema::dropIfExists('product');
        Schema::enableForeignKeyConstraints();
    }

}
Model file
<?php
/* Generated automatically using MigBuilder by Pangodream */

namespace App\Models;

use Illuminate\Database\Eloquent\Factories\HasFactory;
use Illuminate\Database\Eloquent\Model;

class Product extends Model
{
    use HasFactory;
    protected $table = 'product';

    // Fillables (remove the columns you don't need)
    protected $fillable = ['id', 'name', 'slug', 'description', 'price', 'subcategory_id', 'brand_id', 'quantity', ];

    // Parent relationships (change belongsTo to belongsToMany or similar if needed)
    public function Subcategory(){
        return $this->belongsTo(Subcategory::class);
    }
    public function Brand(){
        return $this->belongsTo(Brand::class);
    }
    // Child relationships (change hasMany to hasOne or similar if needed)
    public function ColorProduct(){
        return $this->hasMany(ColorProduct::class);
    }
    public function Size(){
        return $this->hasMany(Size::class);
    }

}
Seeder file
<?php
/* Generated automatically using MigBuilder by Pangodream */

namespace Database\Seeders;

use Illuminate\Database\Seeder;
use App\Models\Product;

class ProductSeeder extends Seeder
{
    /**
     * Run the database seeds.
     *
     * @return void
     */
    public function run()
    {
    // Record sample structure
    $product = [
        //'id' =>  ,
        //'name' => '',
        //'slug' => '',
        //'description' => '',
        //'price' => '',
        //'subcategory_id' =>  ,
        //'brand_id' =>  ,
        //'quantity' => '',
    ];

    }
}
Factory file
<?php
/* Generated automatically using MigBuilder by Pangodream */

namespace Database\Factories;

use Illuminate\Database\Eloquent\Factories\Factory;
use App\Models\Product;

class ProductFactory extends Factory
{
    protected $model = Product::class;
    /**
     * Define the model's default state.
     *
     * @return array
     */
    public function definition()
    {
        return [
            //
        ];
    }
}
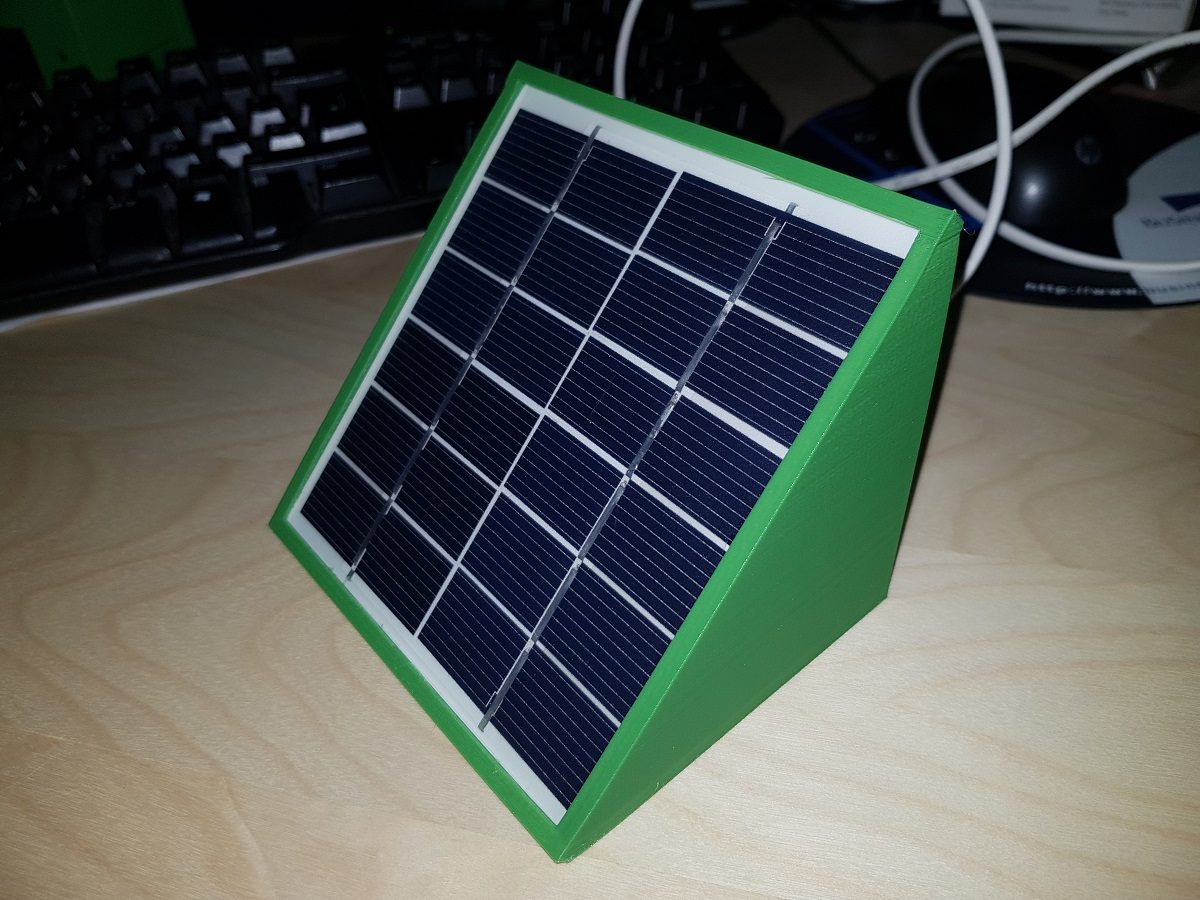
Some 3D print jobs may take hours to finish. When printing to an Ender 3 (and I guess there are other printer models with the same issue) even if the job has finished, the printer stays on and the power module fans continue running. If this happens during night hours, it means a noise that we can avoid easily.
We have a lot of possibilities to achieve our goal, but I don’t want to plug any wire to the Raspi GPIO to control a relay board. I instead used a Sonoff Switch to control a standard multiplug.
We will cover only the switching solution assuming that you have already your Octoprint system connected to your printer and working.
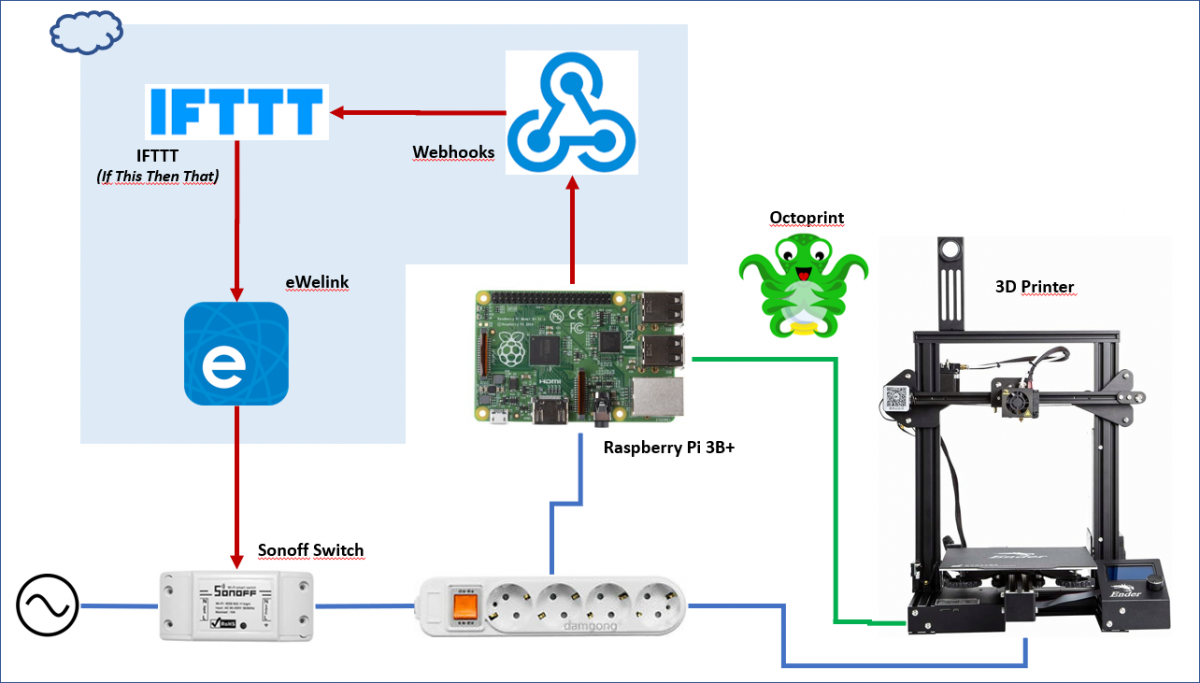
The solution will perform the next steps to switch off the printer and the Raspi:
The printing job will run as usual.
When the job is completed, Octoprint will check for any event listener already configured (in config.yaml file)
Our event configuration will trigger a system command consisting of a Wget to contact to Webhools
Webhooks will notify IFTTT about the finished printing job
IFTTT will take into account (with a programmed filter) the time when the event occurs to switch off (or not) the Sonoff Switch
IFTTT will send a message to eWelink platform to switch off the device
eWelink platform will tell our device to switch off
Though it seems there is a lot of work to do, you’ll see it’s quite easy to set up everything and most of the steps are performed in the background by IFTTT platform.
List of components
IFTTT account: you can use your Google account to log in
This step is quite easy. All you have to do is cutting the multiplug wire to insert the Sonoff switch in it. Be aware that Sonoff switch has an input and an output.
There are a bunch of videos and tutorials about how to do this.
2.- Set up your Sonoff Switch
Use the app installed on your Android phone to set up the switch. Just to clarify how the Sonoff switch works take into account these next points:
The switch connects to your Wifi router:
All the communication occurs between the switch and eWelink server. You cannot (unless you reprogram the switch board) communicate directly to it through your LAN.
To set up the switch using its App, you have to be connected to the same Wifi network at the moment of setup. This point is very important because you may have two wifi networks at home (one for 2.4GHz devices and another one for 5GHz) and probably you connect your mobile to 5GHz one. If you don’t connect to 2.4GHz at the moment you configure your switch you will be telling your device to connect the network you are in and it will not be able to connect to that 5GHz wifi. It is only capable to connect to 2.4GHz AP, so please before configuring the device connect your mobile to your 2.4GHz wifi AP. This is only for during setup process. Once the device is configured you can return your mobile to your 5GHz wifi.
Once the Sonoff device is configured, you have several alternatives to switch it on/off:
Using eWelink App
Using Google Assistant
Using IFTTT (If This Then That) platform. And this will be our choice for this solution.
Just in case you have any issue while reproducing the activation steps shown in the video, here you have the official link to the eWelink setup process.
At this point, you should be able to switch on/off your device by using eWelink App on your Android phone. If you are not, please do not continue beyond this point and review all the configurations.
3.- IFTTT Applet Set up
Now you have your device reachable in the cloud it’s the moment to create an applet in IFTTT. You will use a free account and some of the characteristics of your applet are premium, so you will be limited and you will not be able to publish your applet for others and it will just be available for you. That’s no problem at all.
Log into IFTTT with your account (or even better use your Google one) and then follow the steps shown in the next video:
The applet is now available and you can invoke it in two different ways:
A GET request: from any browser, CURL, WGET, etc
A POST request: and optionally specifying a JSON body with additional data (a security token for instance)
We will use the first option now.
The first thing is to find the key to invoke Webhooks. That key is generated automatically by the platform and it can be easily changed on demand.
To find it, follow the steps shown in the video, then copy it down:
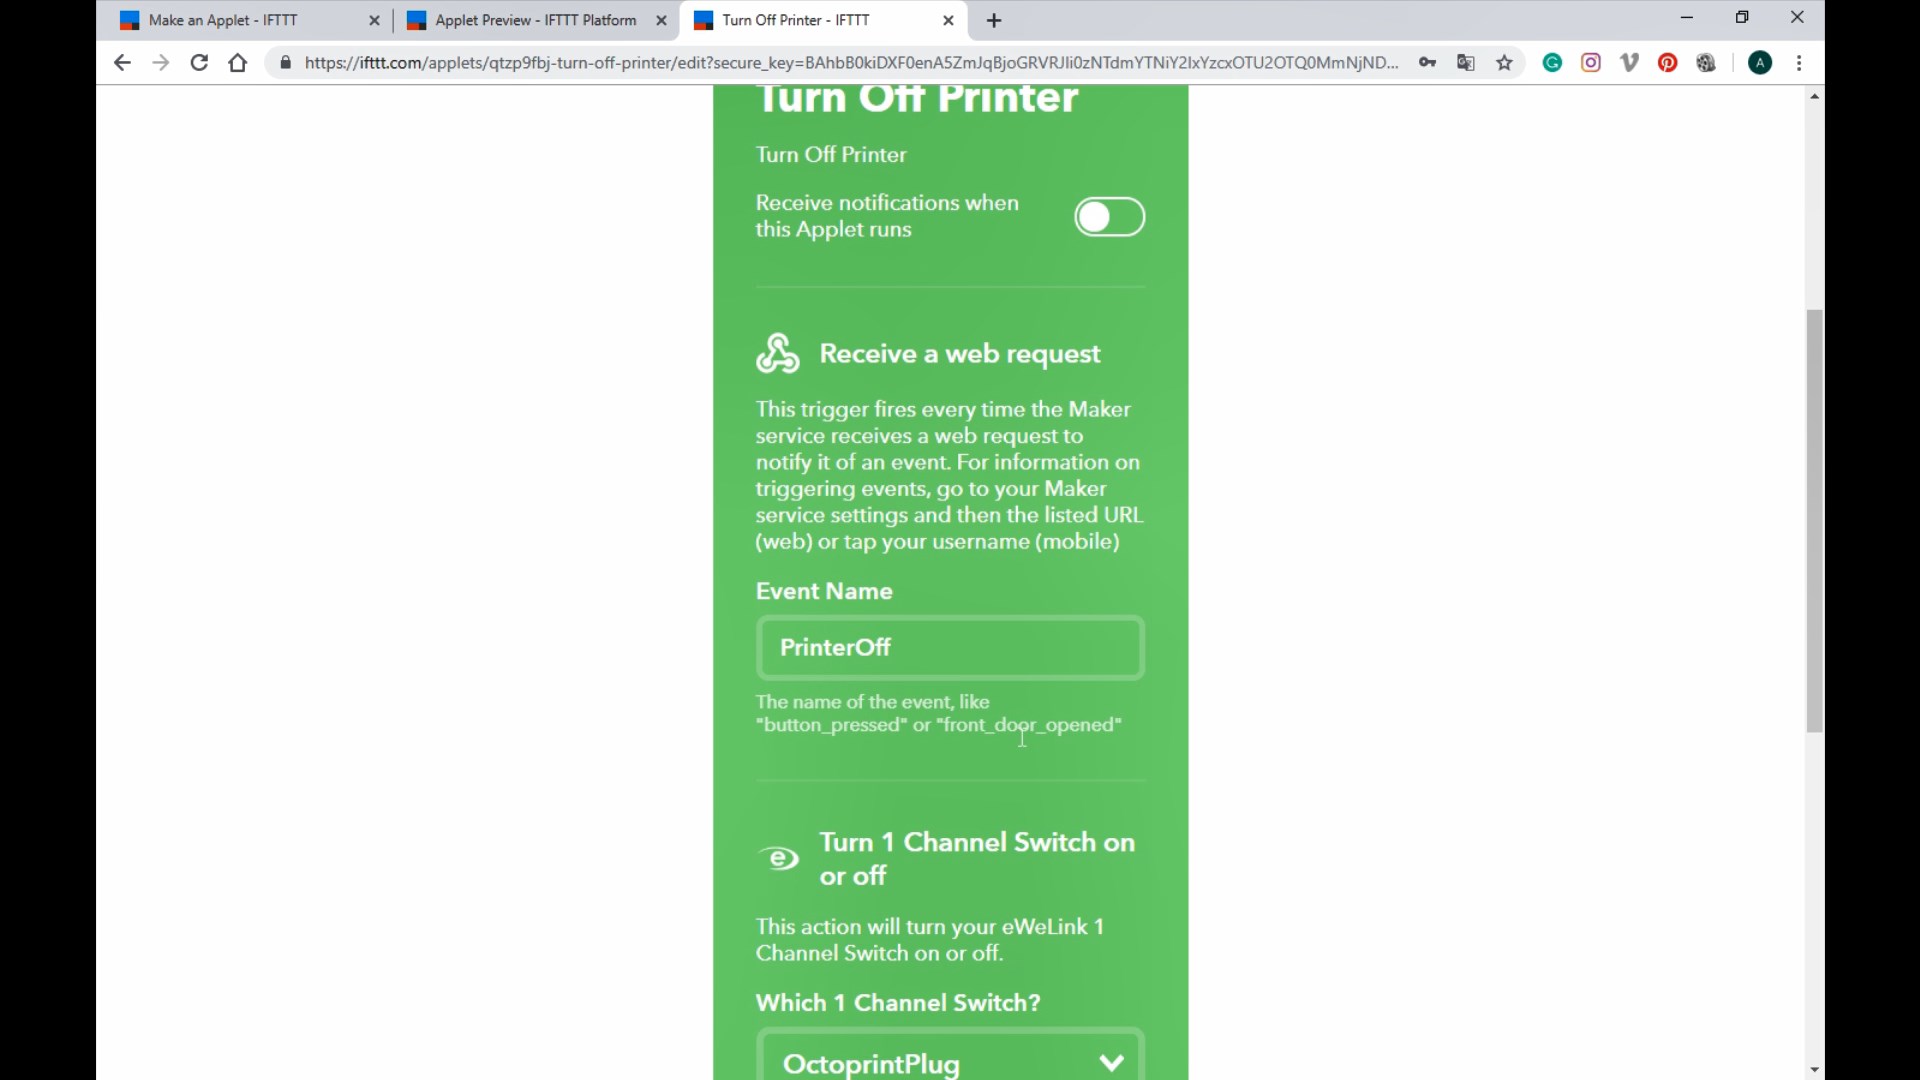
So, at this point, we have everything to invoke our applet:
Event Name: PrinterOff
Webhooks Key: your_webhooks_account_key
Remember the Event Name is not the Applet Name, but the name you specified when you activated the applet:
Replace the key with the value assigned to your account, copy the full URL and paste it on any browser.
If everything goes right you will receive a reply like this
Congratulations! You've fired the PrinterOff event
Change the key value and the response will be an error, but take care because if you change the event name, though it doesn’t exist, it will reply with a success message. So, if you see everything seems to work but the applet seems to be not invoked review the event name in the URL.
4.- Add two applets to control the printer manually (OPTIONAL)
We have an applet that we will use to switch off our printer from Octoprint when a print job is done, but we need to use the eWelink application to switch on/off the printer.
To make things easier, we can add two more applets. Do not modify the one we’ve just created as we will use it after.
Following the shown steps in two videos above, create and activate these two applets:
Applet 1:
On New applet screen
Trigger: Webhooks
Applet Name: ManPrinterOn
Applet Description: Manually switch on the 3D printer
Action: eWeLink
On Enabling Screen
Event Name: ManPrinterOn
Which channel: yourDeviceName
On/Off: ON
Applet 2:
On New applet screen
Trigger: Webhooks
Applet Name: ManPrinterOff
Applet Description: Manually switch off the 3D printer
Action: eWeLink
On Enabling Screen
Event Name: ManPrinterOff
Which channel: yourDeviceName
On/Off: OFF
With our two new applets, we can switch on/off our printer from any browser. To make this task easier, we will create two batch files (if you are a Linux user it will be easy to transform the Windows .bat files)
Install Wget for Windows. The easiest way is to download the installer from SourceForge: Wget for Windows
Create a folder inside your user folder named scripts.
Create two .bat files inside the scripts folder and adapt the content of the files to your Ids, Keys, etc.
echo off
wget https://maker.ifttt.com/trigger/YOUR_EVENT_NAME/with/key/YOUR_WEBHOOKS_KEY -O /dev/null
Both files are the same thing when invoking IFTTT platform and just change the event name (to switch on or off), but the first file, additionally will wait for 45 seconds and open a Chrome instance with the Octoprint URL. Change this to adapt to your configuration or simply remove these lines if you don’t want Octoprint to be invoked automatically when switching on your printer.
Add to direct links to these files to your desktop and all you have to do to switch on or off your printer is double-click on them.
5.- Make applet conditioned to time
Probably you will want your system not turning off each time a print job is finished. Imagine you want to send two or more short jobs to your printer manually.
To prevent this from happening we are going to make our Applet conditioned to time using the Filtering capabilities of IFTTT. This is the premium feature I told you before, but you can use it for your own Applets (you cannot publish them to be used by others).
Coding a filter for an IFTTT Applet is quite easy. It uses Javascript and standard libraries.
To implement our filter all you have to do is deciding what time do you consider the limit when the printer should be turned off automatically. In my case, I chose between 23:00h and 08:00h, because I never print something beyond that time and wait for it to finish.
Here you have a video showing the necessary steps and how to reach the Logging Screen to check if your applet is running ok. Take note that the video doesn’t show exactly the same code as the one mentioned above.
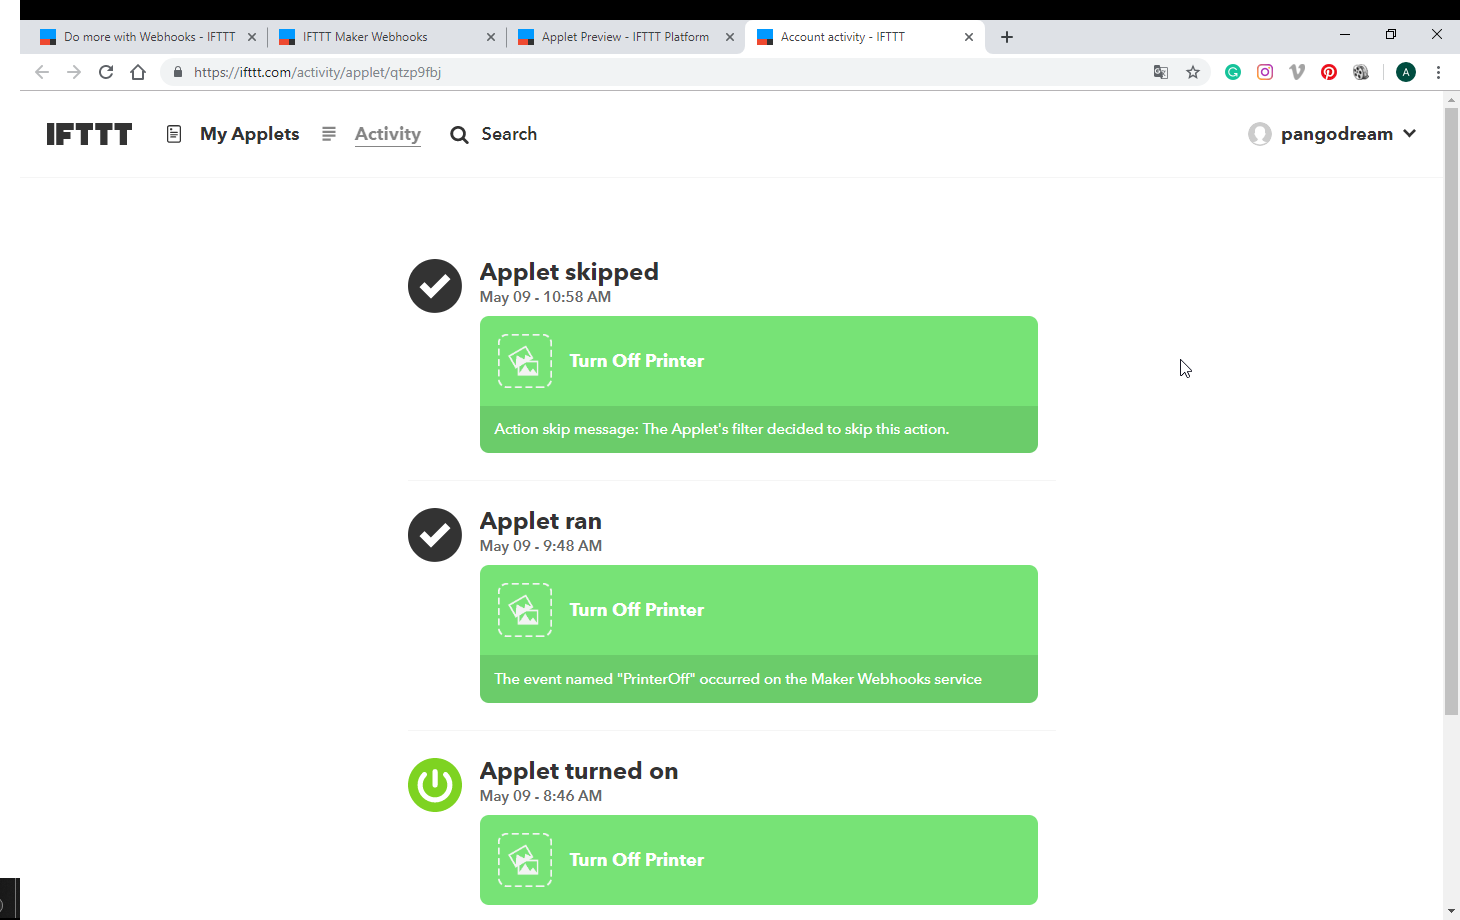
Now, if you invoke your applet from a browser and the limit time you configured in the code has not been reached, the applet execution should be skipped. You can check it in the logging screen and may show something like this:
IFTTT Applet event skipped
6.- Configure event in Octoprint
We need to tell Octoprint what to do when a PrintDone event occurs.
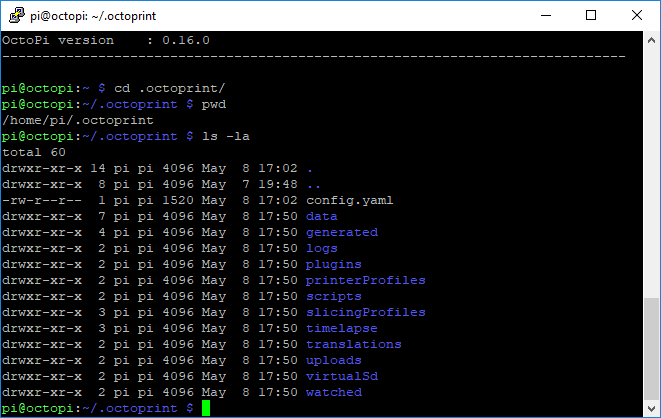
Locate the config.yaml file on your Octoprint installation. If you are using a Raspberry Pi it will probably be here:
Octoprint config.yaml file
Edit the configuration file using your favorite editor and add the following lines to the end of the file.
Replace YOUR_EVENT_NAME and YOUR_WEBHOOKS_KEY with the correct values you obtained in previous steps.
Now, when Octoprint finishes a job, it will invoke your IFTTT Applet and if it occurs after the time you configured in the Applet filtering it will switch off your printer and Raspi.
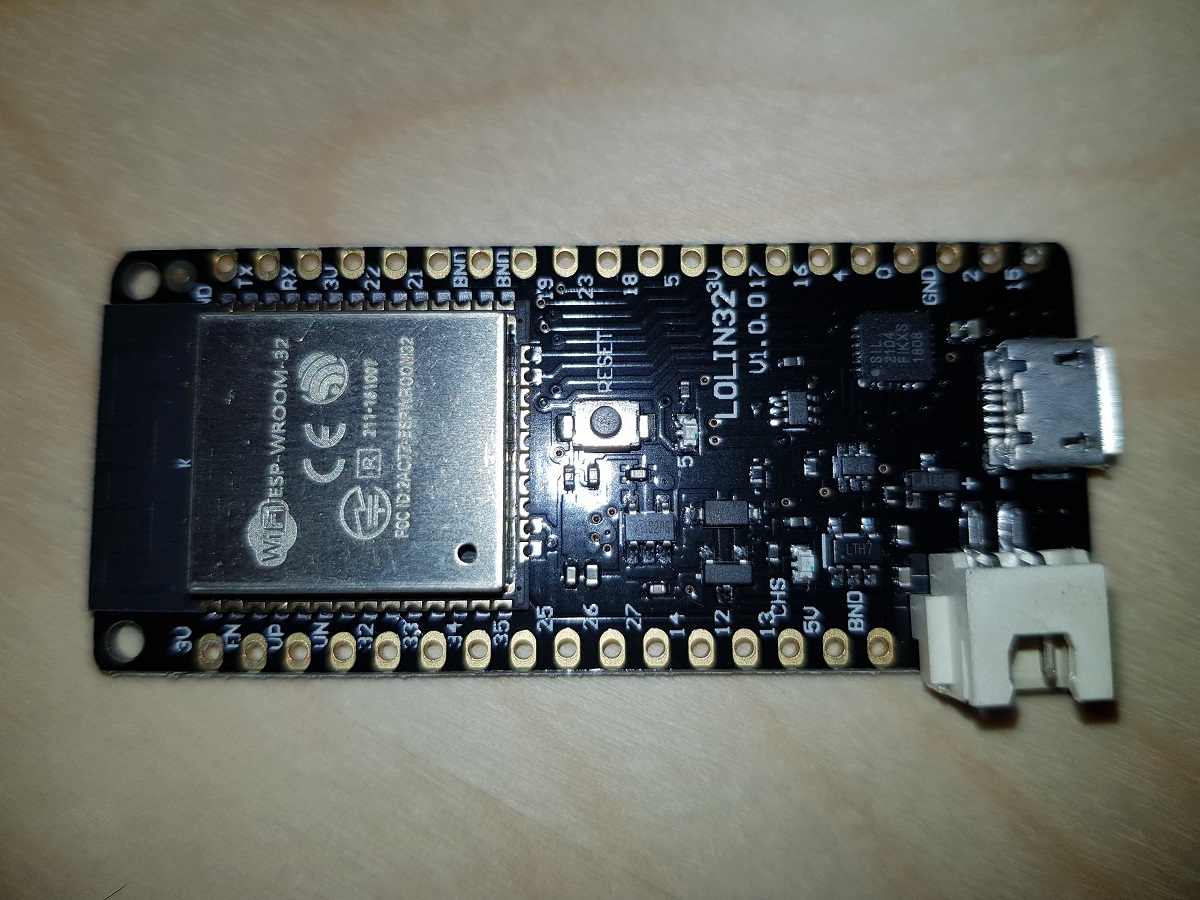
Some of the ESP32 development boards provide a 3.7 Ion-Li battery charger what is an advantage when we want to get a device with the minimum number of components.
One of these boards is Wemos Lolin 32 (with battery charger) which costs about 7$ in eBay.
Wemos Lolin 32
When a battery is plugged in and the board is connected to a power source via the USB connector, the battery starts being charged.
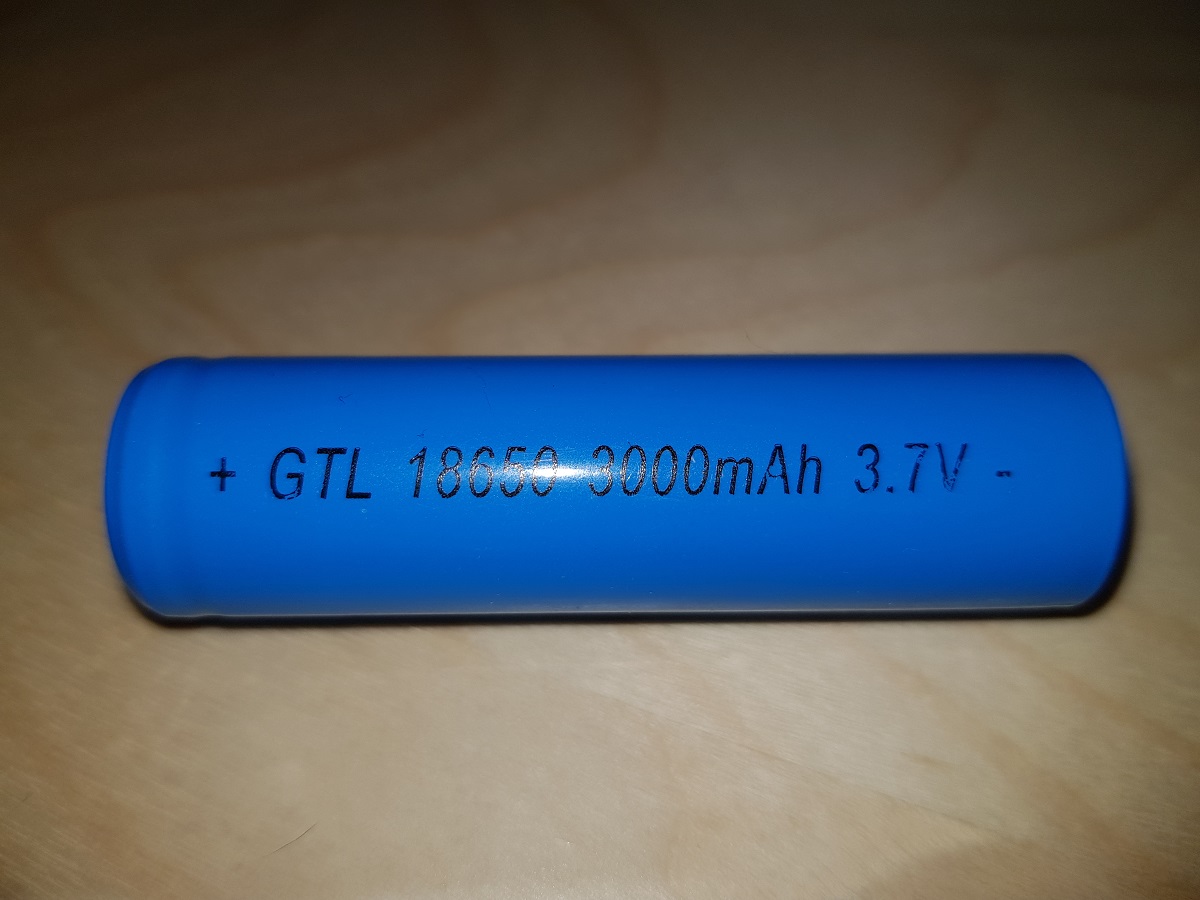
As the ESP32 board counts with several ADC pins, we can use one of them to check the voltage in between the two battery terminals. The only issue with this is that ADC pins expect voltages between 0 and 3.3 volts and our Ion-Li battery voltage range may reach 4.2 volts.
18650 Ion-Li Battery
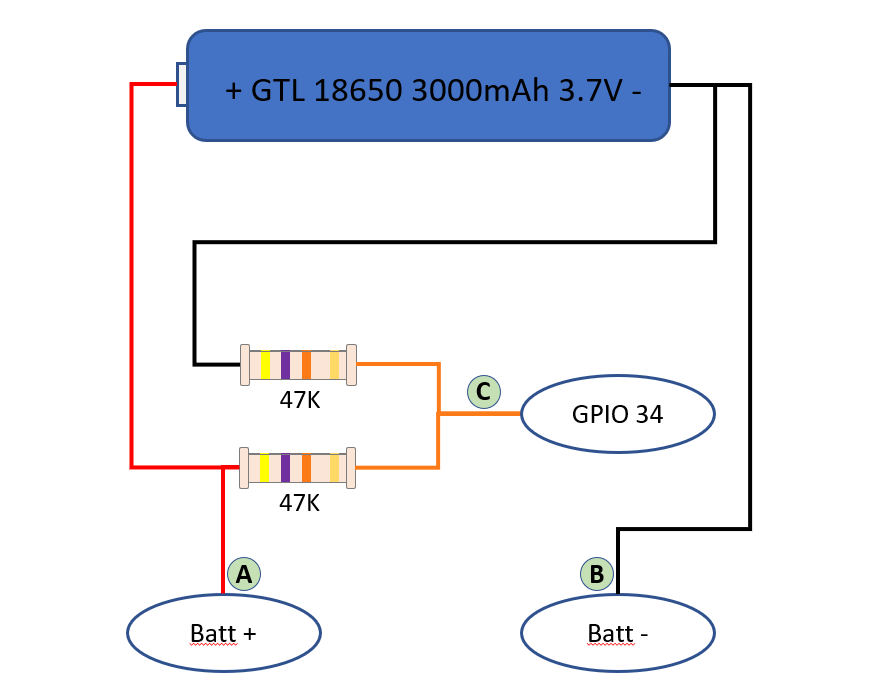
The solution to that is connecting a voltage divider to the battery, so we can divide the volts by 2 and the maximum value will be about 2.1 volts.
Voltage Divider SchemaVoltage Divider
Our voltage divider is built of two 47KΩ resistors. The total impedance between positive and negative terminals will be 94KΩ and that means a current of less than 5 50μA (microamperes, not milliamperes).(Thanks Jonathan)
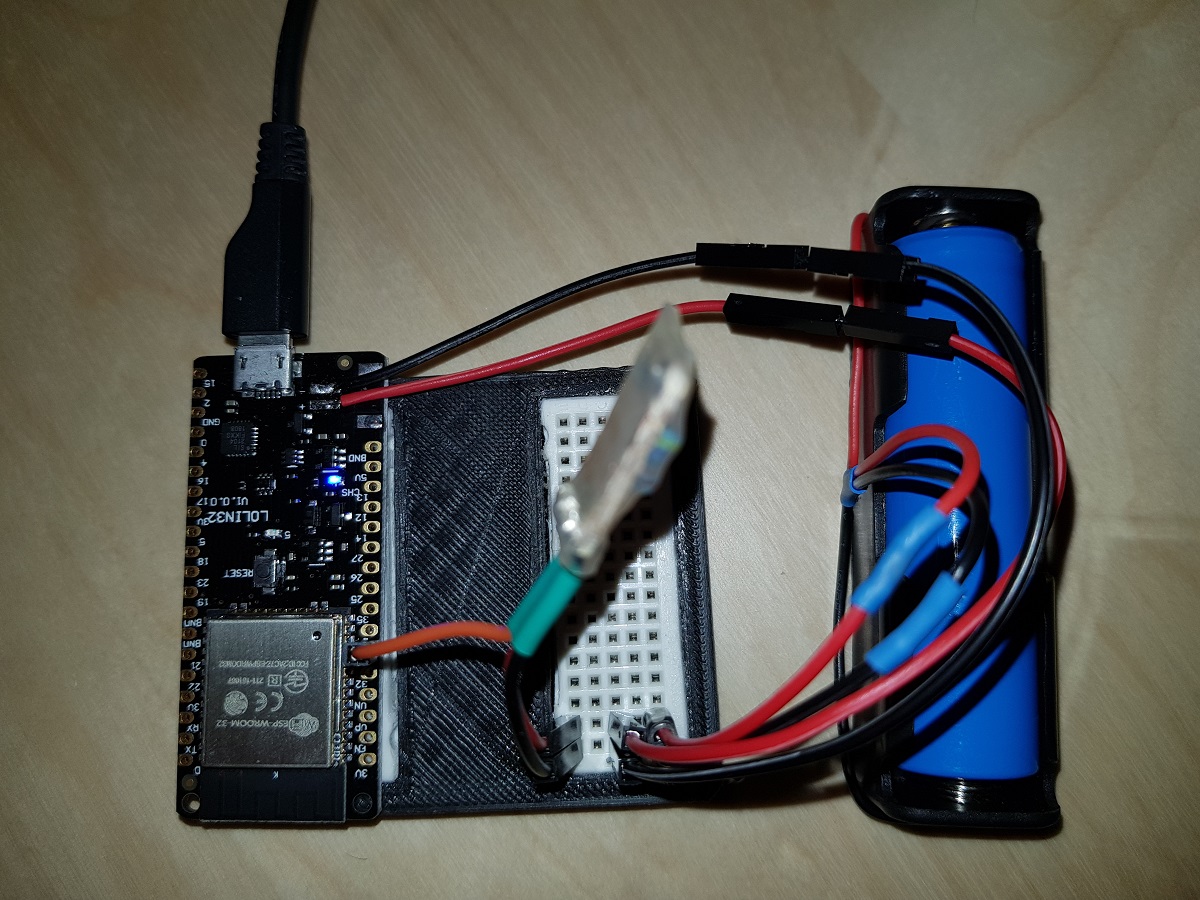
Voltage Divider mounted on Lolin 32
With this, we can measure the voltage applied in GPIO34 (or any other ADC pins of our ESP32) and then, based on a conversion table, calculate the charge level of the battery.
First, we will get the value of ADC pin. This value may vary from 0 to 4096 depending on the voltage applied to it from 0V to 3.3V. So we can establish a constant to calculate the voltage applied to the pin based on its value. This constant, theoretically, will be 3300 / 4096 = 0.8056.
As we are applying a voltage divider and the voltage applied to the pin is half the voltage of the battery, our constant should be 0.8056 x 2 = 1.6113.
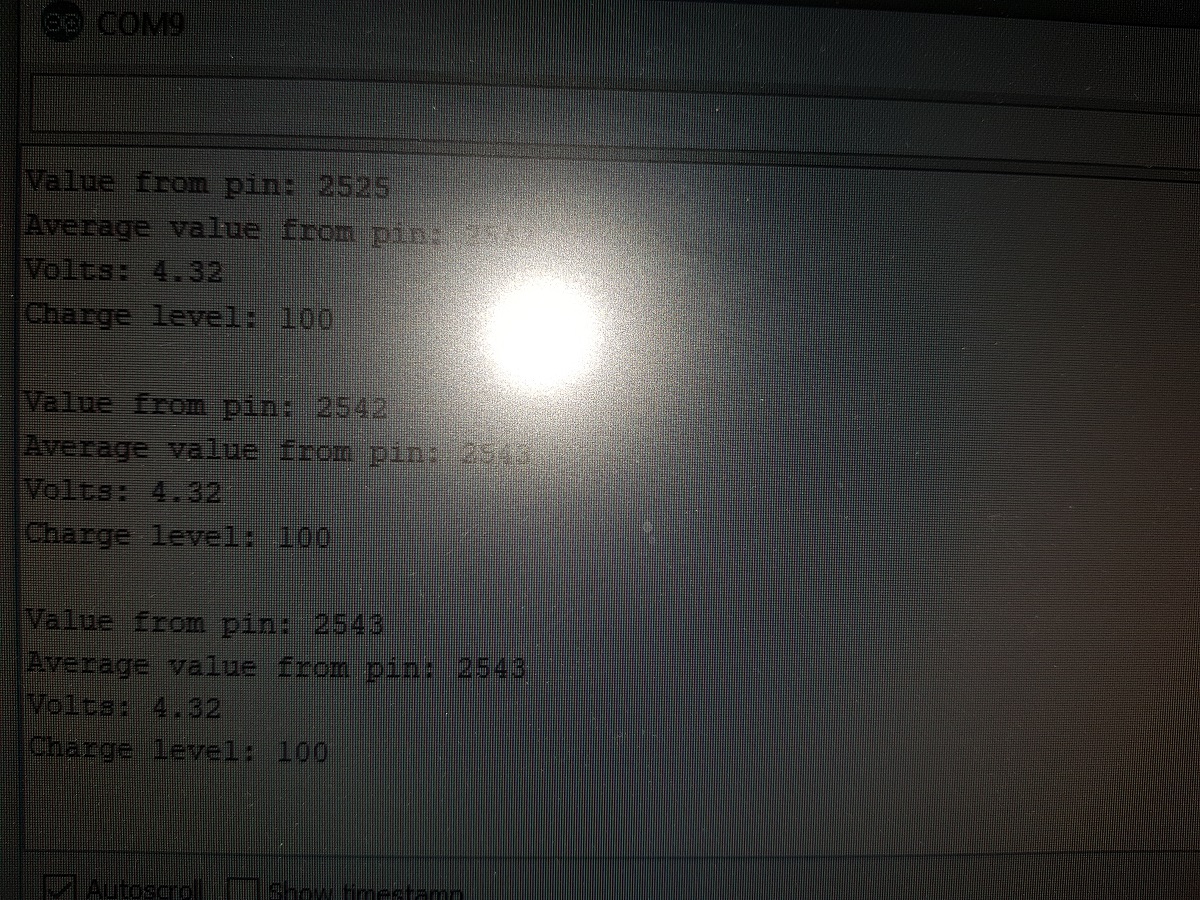
This means, for each unit in ADC pin we have 1.6113 mVolts applied to it.
For instance, if we read the value of the ADC pin and get 2,543, then the voltage applied to the pin should be 2,453 x 1.6113 = 3,952V = 3.95V
ADC pins are not that precise, so the value of our constant should be adjusted to a level we consider it is valid for our components. In my case, after doing some testings I have concluded that the best value for the conversion factor is 1.7.
As I mentioned before, calculating the charge level is a direct translation from the voltage we obtained to a charge level by using a table.
All the code to make these calculations is contained in a library I have created for that purpose. You can find it in Github at Pangodream_18650CL.
All you have to do is downloading the .zip file and add it to Arduino IDE.
There is an example of using the library:
#include <Pangodream_18650_CL.h>

//#define ADC_PIN 34
//#define CONV_FACTOR 1.7
//#define READS 20

Pangodream_18650_CL BL;
/**
 * If you need to change default values you can use it as
 * Pangodream_18650_CL BL(ADC_PIN, CONV_FACTOR, READS);
 */

void setup() {
  Serial.begin(115200);
}

void loop() {
  Serial.print("Value from pin: ");
  Serial.println(analogRead(34));
  Serial.print("Average value from pin: ");
  Serial.println(BL.pinRead());
  Serial.print("Volts: ");
  Serial.println(BL.getBatteryVolts());
  Serial.print("Charge level: ");
  Serial.println(BL.getBatteryChargeLevel());
  Serial.println("");
  delay(1000);
}
And if everything works, it should display something like this on your serial terminal:
If you are reading this I guess you know what Composer and Packagist are and probably you need to know how to build your own package or you just simply don’t remember all the steps to do it.
Otherwise, you can get some very basic info of Composer here: Wikipedia Composer and if you want to dive into the documentation then you can visit Composer Documentation page. Packagist is the main repository for Composer packages.
Preparation
We will create a package and before writing a line of code, we will compile some basic information. I’m using mine as an example.
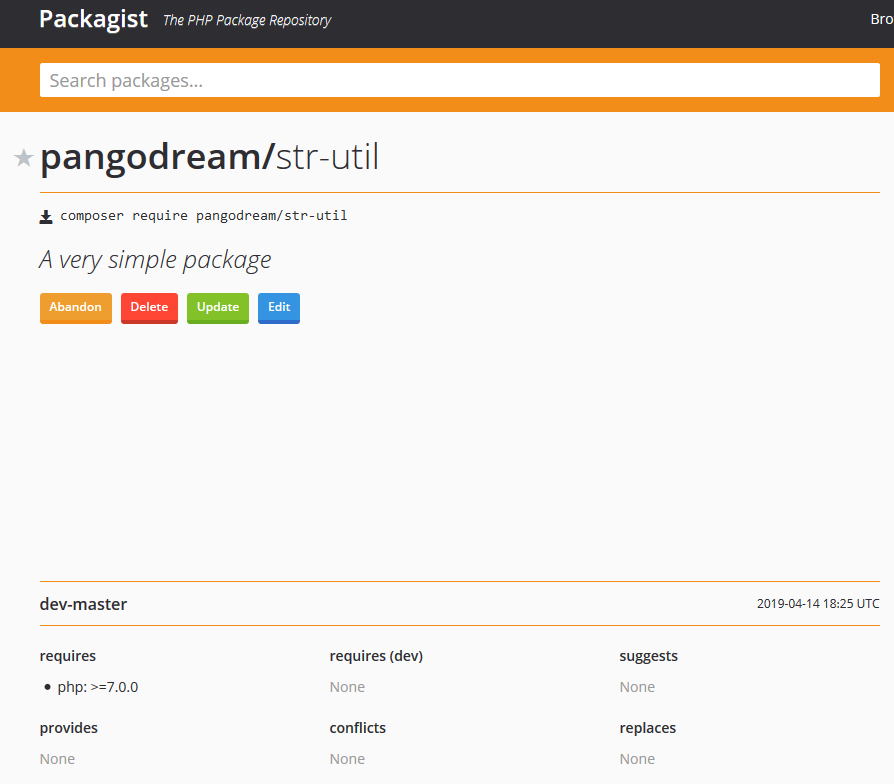
Developer name / Organization: pangodream
Package name: str-util
Description: A very simple package
Setting up the project for the package
Create the project folder
In our case, the project folder will be str-util
Create two more folders inside the project one; one for the package code and the other one for testing. The folder structure should be:
str-util
    /src
    /test
Create composer.json file
Access the project folder and create composer.json by typing
> composer init
Composer will try to guess some of the configuration values
Once we confirm the file generation, a composer.json file will be in our project folder and it will contain some very similar to this:
So, this is now the content of our project folder:
str-util
    composer.json
    /src
    /test
Edit to complete composer.json
We will add some information about autoloading (“autoload”) and also tell composer our dependencies (“require”). For instance, which is the minimum version of PHP that our library needs to work.
Inside the composer.json file, we told composer the path were StrUtil package classes are. So, each time we reference in our code a class qualified with its package name Composer will look into the composer.json file to know where that class file is.
In our case, the package name is StrUtil and the class is Counter (because our class will contain some methods to count words, paragraphs, letters, …).
Inside src folder, let’s create a new folder for our package with the name we gave it inside composer.json: StrUtil, and inside that folder, we will place one of our package classes file. Now, we have this folder hierarchy
/str-util
    /src
        /StrUtil
            /Counter.php
So, when PHP finds a reference to a class with the ‘use’, it will look into composer.json. For instance, let’s say we have a line of code like this
use StrUtil\Counter;
What composer.json file indicates is that StrUtil package is under src folder
"autoload": {
        "psr-0": {
            "StrUtil": "src/"
        }
    }
So, the Counter.php file containing the Counter class code should be located in
src/StrUtil/Counter.php
Now we know how the class file is located and loaded, let’s write down the code:
<?php
/**
 * Created by Pangodream.
 * Date: 14/04/2019
 * Time: 18:50
 */

namespace StrUtil;


class Counter
{
    /**
     * @param string $text The text we want to count the number of words it consist of
     * @return int The number of words in text
     */
    public static function countWords(string $text){
        /** @var int $count To store the result of counting words in text */
        $count = 0;
        //Clean up the string
        $text = trim($text);
        /** @var array $words Array containing the words */
        $words = explode(" ", $text);
        //Array size is the number of words in text
        $count = sizeof($words);
        return $count;
    }
}
And now we know how to reference that class, let’s create a test file to verify that our class works. We will name this file testStrUtil.php and save it inside the test folder we created before:
str-util
    /test
        /testStrUtil.php
<?php
/**
 * Created by Pangodream.
 * Date: 14/04/2019
 * Time: 19:03
 */

//Use composer autoload to load class files
require_once __DIR__ . "/../vendor/autoload.php";

//Required package/libraries
use StrUtil\Counter;

$text = "Aequam memento rebus in arduis servare mentem";
$wordCount = Counter::countWords($text);
echo "The txt contains ".$wordCount." word(s)\r\n";
Testing our package
From the str-util folder, we are going to invoke the test PHP file and see what happens:
str-util> php test/testStrUtil.php
The text contains 7 word(s)
Our package containing only a class is working and now we are ready to publish it.
Repository part: github.com
The next thing we’ll do is creating a new repository with our GitHub account.
Create the repository at github.com
Go to github.com and create a new repository called str-util. It is a good practice to give a repository description and also initialize with a README file. Because you are going to share the package in packagist.org you need to Add a license file, in our case an MIT License.
Add package files to the repository
Now we will make an initial commit to our repository with the files we already have created inside the src folder.
From the str-util folder, execute the following commands:
---->str-util> git init
Initialized empty Git repository in C:/cli/str-util/.git/

---->str-util> git add src
---->str-util> git add composer.json

---->str-util> git commit -m "Initial commit"
[master (root-commit) af7bbac] Initial commit
 2 file changed, 28 insertions(+)
 create mode 100644 src/StrUtil/Counter.php
 create mode 100644 composer.json

---->str-util> git remote add origin https://github.com/YOUR_USER_NAME/str-util.git

---->str-util> git pull origin master --allow-unrelated-histories
From https://github.com/YOUR_USER_NAME/str-util
 * branch            master     -> FETCH_HEAD
Merge made by the 'recursive' strategy.
 README.md | 2 ++
 1 file changed, 2 insertions(+)
 create mode 100644 README.md

---->str-util> git push origin master
fatal: HttpRequestException encountered.
   Error al enviar la solicitud.
Username for 'https://github.com': YOUR_USER_NAME
Password for 'https://YOUR_USER_NAME@github.com':
Counting objects: 7, done.
Delta compression using up to 4 threads.
Compressing objects: 100% (4/4), done.
Writing objects: 100% (7/7), 928 bytes | 309.00 KiB/s, done.
Total 7 (delta 0), reused 0 (delta 0)
To https://github.com/YOUR_USER_NAME/str-util.git
   16f9ce1..8f91cfa  master -> master
Let’s analyze what we have done:
git init
Initialize the Git repository in our local directory. Git will create its hidden files to control operations made on the repository.
git add src

git add composer.json
We are telling Git which files we want to add to the repository. In our case only the src folder and the composer.json file will be synchronized, the rest of the files will stay only in our local machine.
git commit -m "Initial commit"
Our first Initial commit to our local instance of the repository. We haven’t sent anything to github.com until now.
Now we will add an origin (origin means remote repository) to our local repository. This is the reference to our github.com repository. Replace YOUR_USER_NAME with your own Github user name.
If at this point we try to push (send to remote) the commit we made locally, an error will occur because in the remote instance of the repository there are files that don’t exist locally (README file for instance). We cannot send and receive at the same time under normal circumstances, so we will first pull files from origin ignoring possible conflicts:
After trying several options that I found on the web, I chose this one as the better to connect an ESP32 to an ILI9341 TFT display.
ESP32
ILI9341
3V3
VCC
GND
GND
D15
CS
D2
RESET
D4
D/C
D23
MOSI
D18
SCK
Not connected
MISO
3V3 (***or D19)
LED
The code:
/**
 * ILI9341 TFT libraries and resources
 */
const int TFT_CS = 15;
const int TFT_DC = 4;
const int TFT_MOSI = 23;
const int TFT_SLK = 18;
const int TFT_RST = 2;
const int TFT_LED = 19;

#include "SPI.h"
#include "Adafruit_GFX.h"
#include "Adafruit_ILI9341.h"
Adafruit_ILI9341 tft = Adafruit_ILI9341(TFT_CS, TFT_DC, TFT_MOSI, TFT_SLK, TFT_RST);

void setup() {
  tft.begin();
  tft.setRotation(3); //Landscape orientation
}
The reason for the two possibilities for the LED pin is the next:
If you connect LED pin directly to 3V3 you will get maximum brightness in your screen. LED pin controls the backlight of your TFT display.
In my case, I didn’t want to have max brightness but I wanted to control the intensity based on ambient light, so I decided to connect LED pin to any of the IO pins of the ESP32 (#19 in the showed example).
The code to control backlight intensity (once you have connected LED to pin D19) is as follows:
Inserting the code above allows you to set the backlight intensity at any point just invoking setBGLuminosity() function passing a value between 0 and 255.
This website uses cookies to improve your experience. We'll assume you're ok with this, but you can opt-out if you wish.AcceptReject
Privacy & Cookies Policy
Privacy Overview
This website uses cookies to improve your experience while you navigate through the website. Out of these, the cookies that are categorized as necessary are stored on your browser as they are essential for the working of basic functionalities of the website. We also use third-party cookies that help us analyze and understand how you use this website. These cookies will be stored in your browser only with your consent. You also have the option to opt-out of these cookies. But opting out of some of these cookies may affect your browsing experience.
Necessary cookies are absolutely essential for the website to function properly. This category only includes cookies that ensures basic functionalities and security features of the website. These cookies do not store any personal information.
Any cookies that may not be particularly necessary for the website to function and is used specifically to collect user personal data via analytics, ads, other embedded contents are termed as non-necessary cookies. It is mandatory to procure user consent prior to running these cookies on your website.