Read a Xiaomi Mi Smart scale using an ESP32

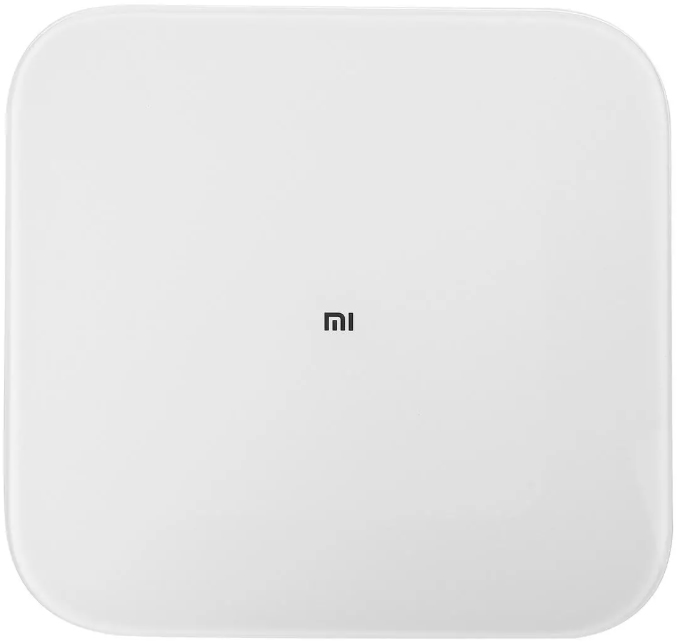
Xiaomi Mi Smart is a digital scale with BLE interface. This allows it to broadcast your weight to any device like your smart phone and incorporate the measurements to an application like Samsung Health.

Xiaomi Mi Smart Scale

 Two years ago I was trying to read BLE messages from an ESP32, but Arduino BLE libraries didn’t work very well at that moment and all I got were some headaches. I wasn’t even able to match the Weight Measurement remote characteristic, so once the ESP32 connected to the scale it wasn’t able to implement the callback functions.

Today I’ve tried again, and I made it work!!!

Calculate the UUIDs

I have used the BLE_Client example (under ESP32 dev board samples).  In order to connect and read values from any device you need two unique identifiers (16 bit UUID alias):

Now, with this two short uuids, we will calculate the long (128 bits) uuid by using the next formula:

128bit_base_uuid = 16bit_uuid_alias * 2^96 + Bluetooth_Base_UUID

where the Bluetooth_Base_UUID is 1000800000805F9B34FB (00000000-0000-1000-8000-00805F9B34FB)

In our case we will be using the string version of the 128bit uuid and that means all we have to do to calculate the long uuid for the service and the characteristic is concatenating the uuids (aliases and Bluetooth Base one) in the following way:

  • Service UUID: 0000181D-0000-1000-8000-00805F9B34FB
  • Characteristic UUID: 00002A9D-0000-1000-8000-00805F9B34FB
Finding our weight scale

Bring your Xiaomi scale next to your ESP32 MCU and load the next sketch using Arduino IDE:

/**
 * An ESP32 BLE client to find Xiaomi Mi Smart weight scale
 * Author Pangodream
 * Date 2020.05.31
 */

#include "BLEDevice.h"
//Base UUIDs
//Weight Scale service
static BLEUUID srvUUID("0000181d-0000-1000-8000-00805f9b34fb");

/**
 * Callback class for each advertised device during scan
 */
class deviceCB: public BLEAdvertisedDeviceCallbacks {
 //Called on each advertised device
  void onResult(BLEAdvertisedDevice advertisedDevice) {
    // We have found a device, let us now see if it contains the service we are looking for.
    if (advertisedDevice.haveServiceUUID() && advertisedDevice.isAdvertisingService(srvUUID)) {
      if(advertisedDevice.getName() != "MI_SCALE"){
        Serial.print("Weight scale (no MI_SCALE) device found with address ");
        Serial.print(advertisedDevice.getAddress().toString().c_str());
        Serial.print(" and name ");
        Serial.println(advertisedDevice.getName().c_str());
      } else {
        Serial.print("Xiaomi Mi Smart weight scale found with address ");
        Serial.println(advertisedDevice.getAddress().toString().c_str());
        BLEDevice::getScan()->stop();
        Serial.println("End of scan");
      }
    } else {
      Serial.print("Non weight scale device found with address ");
      Serial.println(advertisedDevice.getAddress().toString().c_str());
    }
  } 
};

void setup() {
  Serial.begin(115200);
  Serial.println("Devices scan");
  BLEDevice::init("");
  BLEScan* pBLEScan = BLEDevice::getScan();
  pBLEScan->setAdvertisedDeviceCallbacks(new deviceCB());
  pBLEScan->setInterval(1349);
  pBLEScan->setWindow(449);
  //Set active scan
  pBLEScan->setActiveScan(true);
  //Scan during 5 seconds
  pBLEScan->start(5, false);
}

void loop() {

  delay(1000);
}

The sketch starts an active scan to find all the BLE servers (devices) that are advertising themselves at that moment.

The scan results are shown at the Serial Monitor (115200 bauds) and if a Xiaomi Mi Smart scale is found (and its name is MI_SCALE) something like the next should appear in your monitor:

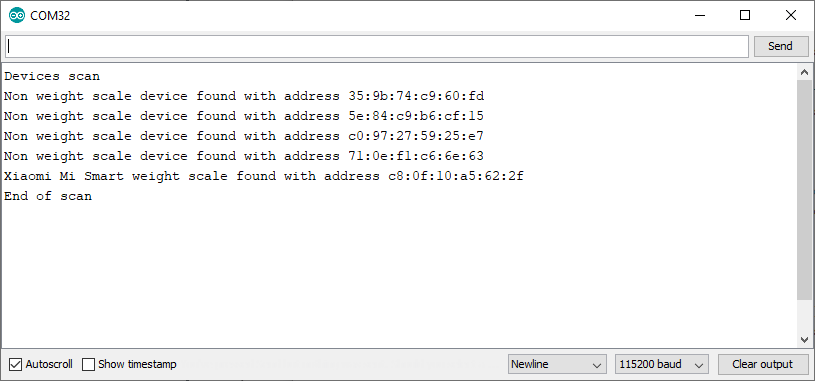
If your weight scale was present in the scan and you can read the message “Xiaomi Mi Smart weight scale found with address xx:xx:xx:xx:xx:xx” then you can continue with our next goal, which is to retrieve data from weight measurement.

Retrieving data

When the ESP32 is scanning for devices, it only reads the service beacons sent by each BLE server to advertise itself, but when we use the scale and it broadcasts the calculated weight, it doesn’t send the same type of message (it is not a service message, but a characteristic one).

Note that we haven’t used yet the characteristic UUID we calculated before and we’ve only used the service one.

Let’s load a new sketch into the ESP32 MCU to retrieve some data from the characteristic:

/**
 * An ESP32 BLE client to retrieve data from the Weight Measurement characteristic  
 * of a Xiaomi Mi Smart weight scale
 * Author Pangodream
 * Date 2020.05.31
 */

#include "BLEDevice.h"
//Base UUIDs
//Weight Scale service
static BLEUUID srvUUID("0000181d-0000-1000-8000-00805f9b34fb");
//Weight Measurement characteristic
static BLEUUID chrUUID("00002a9d-0000-1000-8000-00805f9b34fb");

static BLEAdvertisedDevice* scale;
static BLERemoteCharacteristic* remoteChr;
static boolean doConnect = false;
static boolean connected = false;
static int year = 0;

/**
 * Callback function for characteristic notify / indication
 */
static void chrCB(BLERemoteCharacteristic* remoteChr, uint8_t* pData, size_t length, bool isNotify) {
    //Console debugging
    Serial.print("Received data. Length = ");
    Serial.print(length);
    Serial.print(". - Data bytes: ");
    for(int i =0; i< length; i++){
      Serial.print(pData[i]);
      Serial.print("  ");
    }
    Serial.println(" ");
    //End of console debugging
    
    //Parsing the received data and calculate weight
    boolean temporary = true;
    int rcvdYear = pData[3];
    //If we received a year for the first time, store it in the year variable
    //The first year we receive indicates a temporary measurement
    if(year == 0){
      year = rcvdYear;
    }else{
      //If year has been previously defined and the year we have received is
      //greater than it, then the measurement is not temporary, is the final one
      if(rcvdYear > year){
        temporary = false;
      }
    }
    double weight = 0;
    weight = (pData[1] + pData[2] * 256) * 0.005;
    
    Serial.print("Weight: ");
    Serial.print(weight);
    Serial.print(" Kg - ");
    if(temporary){
      Serial.println(" (Provisional)");
    }else{
      Serial.println(" (Definitive)");
    }
}

/**
 * Callback class for each advertised device during scan
 */
class deviceCB: public BLEAdvertisedDeviceCallbacks {
 //Called on each advertised device
  void onResult(BLEAdvertisedDevice advertisedDevice) {
    // We have found a device, let us now see if it contains the service we are looking for.
    if (advertisedDevice.haveServiceUUID() && advertisedDevice.isAdvertisingService(srvUUID)) {
      if(advertisedDevice.getName() != "MI_SCALE"){
        Serial.print(".");
      } else {
        Serial.println("  Found!");
        BLEDevice::getScan()->stop();
        Serial.println("Stopping scan and connecting to scale");
        scale = new BLEAdvertisedDevice(advertisedDevice);
        doConnect = true;
      }
    } else {
      Serial.print(".");
    }
  } 
};
/**
 * Callback class for device events
 */
class ClientCB : public BLEClientCallbacks {
  void onConnect(BLEClient* pclient) {

  }

  void onDisconnect(BLEClient* pclient) {
    Serial.println("Disconnected. Reconnecting...");
    connected = false;
  }
};

bool connectToScale() {
    Serial.println("Stablishing communications with scale:");
    BLEClient*  pClient  = BLEDevice::createClient();
    Serial.println("    BLE client created");

    pClient->setClientCallbacks(new ClientCB());

    // Connect to the remove BLE Server.
    pClient->connect(scale);
    Serial.println("    Connected to scale");

    // Obtain a reference to the service we are after in the remote BLE server.
    BLERemoteService* pRemoteService = pClient->getService(srvUUID);
    if (pRemoteService == nullptr) {
      Serial.println("    Error: Failed to find service");
      pClient->disconnect();
      return false;
    }
    Serial.println("    Service found");

    remoteChr = pRemoteService->getCharacteristic(chrUUID);
    if (remoteChr == nullptr) {
      Serial.print("    Failed to find characteristic");
      pClient->disconnect();
      return false;
    }
    Serial.println("    Characteristic found");
    Serial.println("    Setting callback for notify / indicate");
    remoteChr->registerForNotify(chrCB);
    return true;
}

void setup() {
  Serial.begin(115200);
  Serial.println("Searching for MI_SCALE device");
  BLEDevice::init("");
  BLEScan* pBLEScan = BLEDevice::getScan();
  pBLEScan->setAdvertisedDeviceCallbacks(new deviceCB());
  pBLEScan->setInterval(1349);
  pBLEScan->setWindow(449);
  //Set active scan
  pBLEScan->setActiveScan(true);
  //Scan during 5 seconds
  pBLEScan->start(5, false);
}

void loop() {
  if(doConnect && !connected){
    connected = connectToScale();
  }
  delay(1000);
}

Reboot the MCU and take a look to the serial monitor. If everything goes right, something similar to this should be shown:

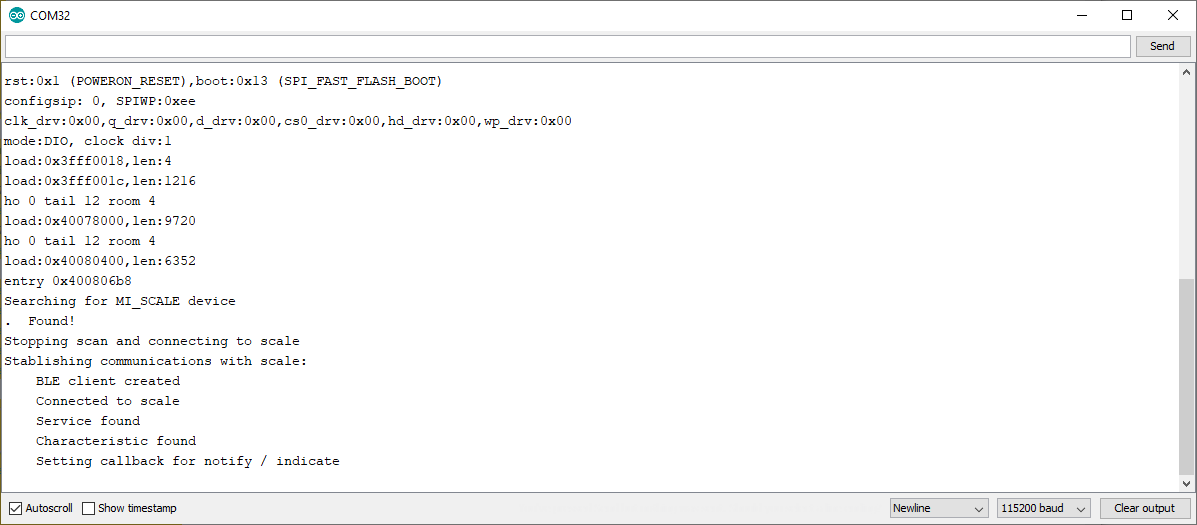
The sketch performs these tasks:

  1. Scan devices to find the Xiomi scale
  2. Connects to the scale
  3. Search for the Weight Scale service
  4. Instantiates the service
  5. Search for the remote characteristic
  6. Instantiates the remote characteristic
  7. Sets the callBack function for the characteristic

In this way, when the scale begins to measure weight, our callback function will be invoked receiving the data.

At this point, the ESP32 is waiting to receive something in the callBack function. Put some weight over the scale and you should see the provisional and definitive measurements at the serial monitor.

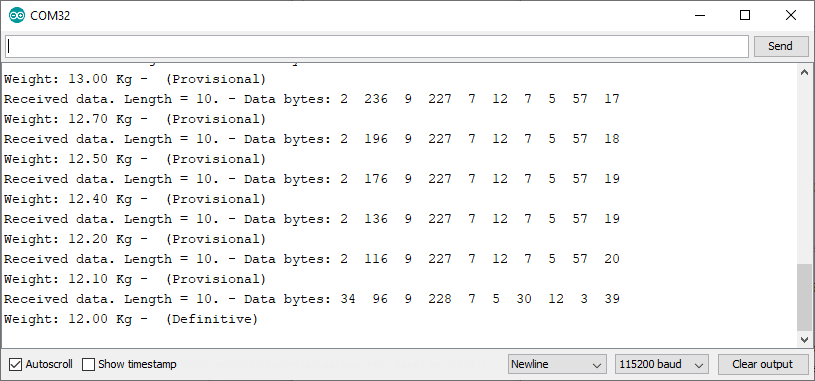
The callback function always receive 10 bytes of information. These bytes can be parsed to get the weight and timestamp values in the following way:

Parsing the XIOMI Scale BLE data

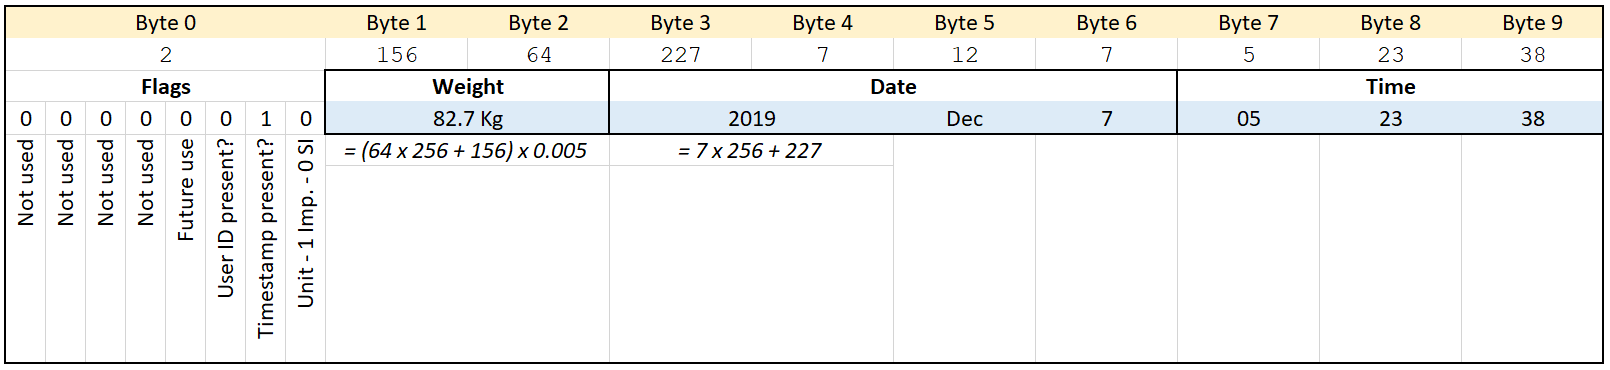
The way we can differentiate between the provisional and the definitive measurements is looking at the year in the timestamp. While measurements are provisional, the scale sends a fake year and not the current one. So, all we hve to do is taking note of the value for the year in the first data packet we receive and then compare to the rest of the years we receive.

When the received year is greater than the first year we received that is the definitive measurement and we can get the calculated weight.

Why BLE_client sketch doesn’t work

If yoy try the sketch located at File / Examples / ESP32 BLE Arduino / BLE Client it won’t work and will not receive any chararteristic message even when you change the UUIDs.

The reason is this piece of code

if(pRemoteCharacteristic->canNotify())
      pRemoteCharacteristic->registerForNotify(notifyCallback);

To set the callback function for the remote characteristic, first it checks the characteristic can be notifiable (method canNotify()) and our characteristic is not.

If you study the BLE connection using any app for that purpose (I use nRF Connect from Nordic Semiconductor) you will notice that the characteristic we are using is not notifiable but ‘indicate’ type:

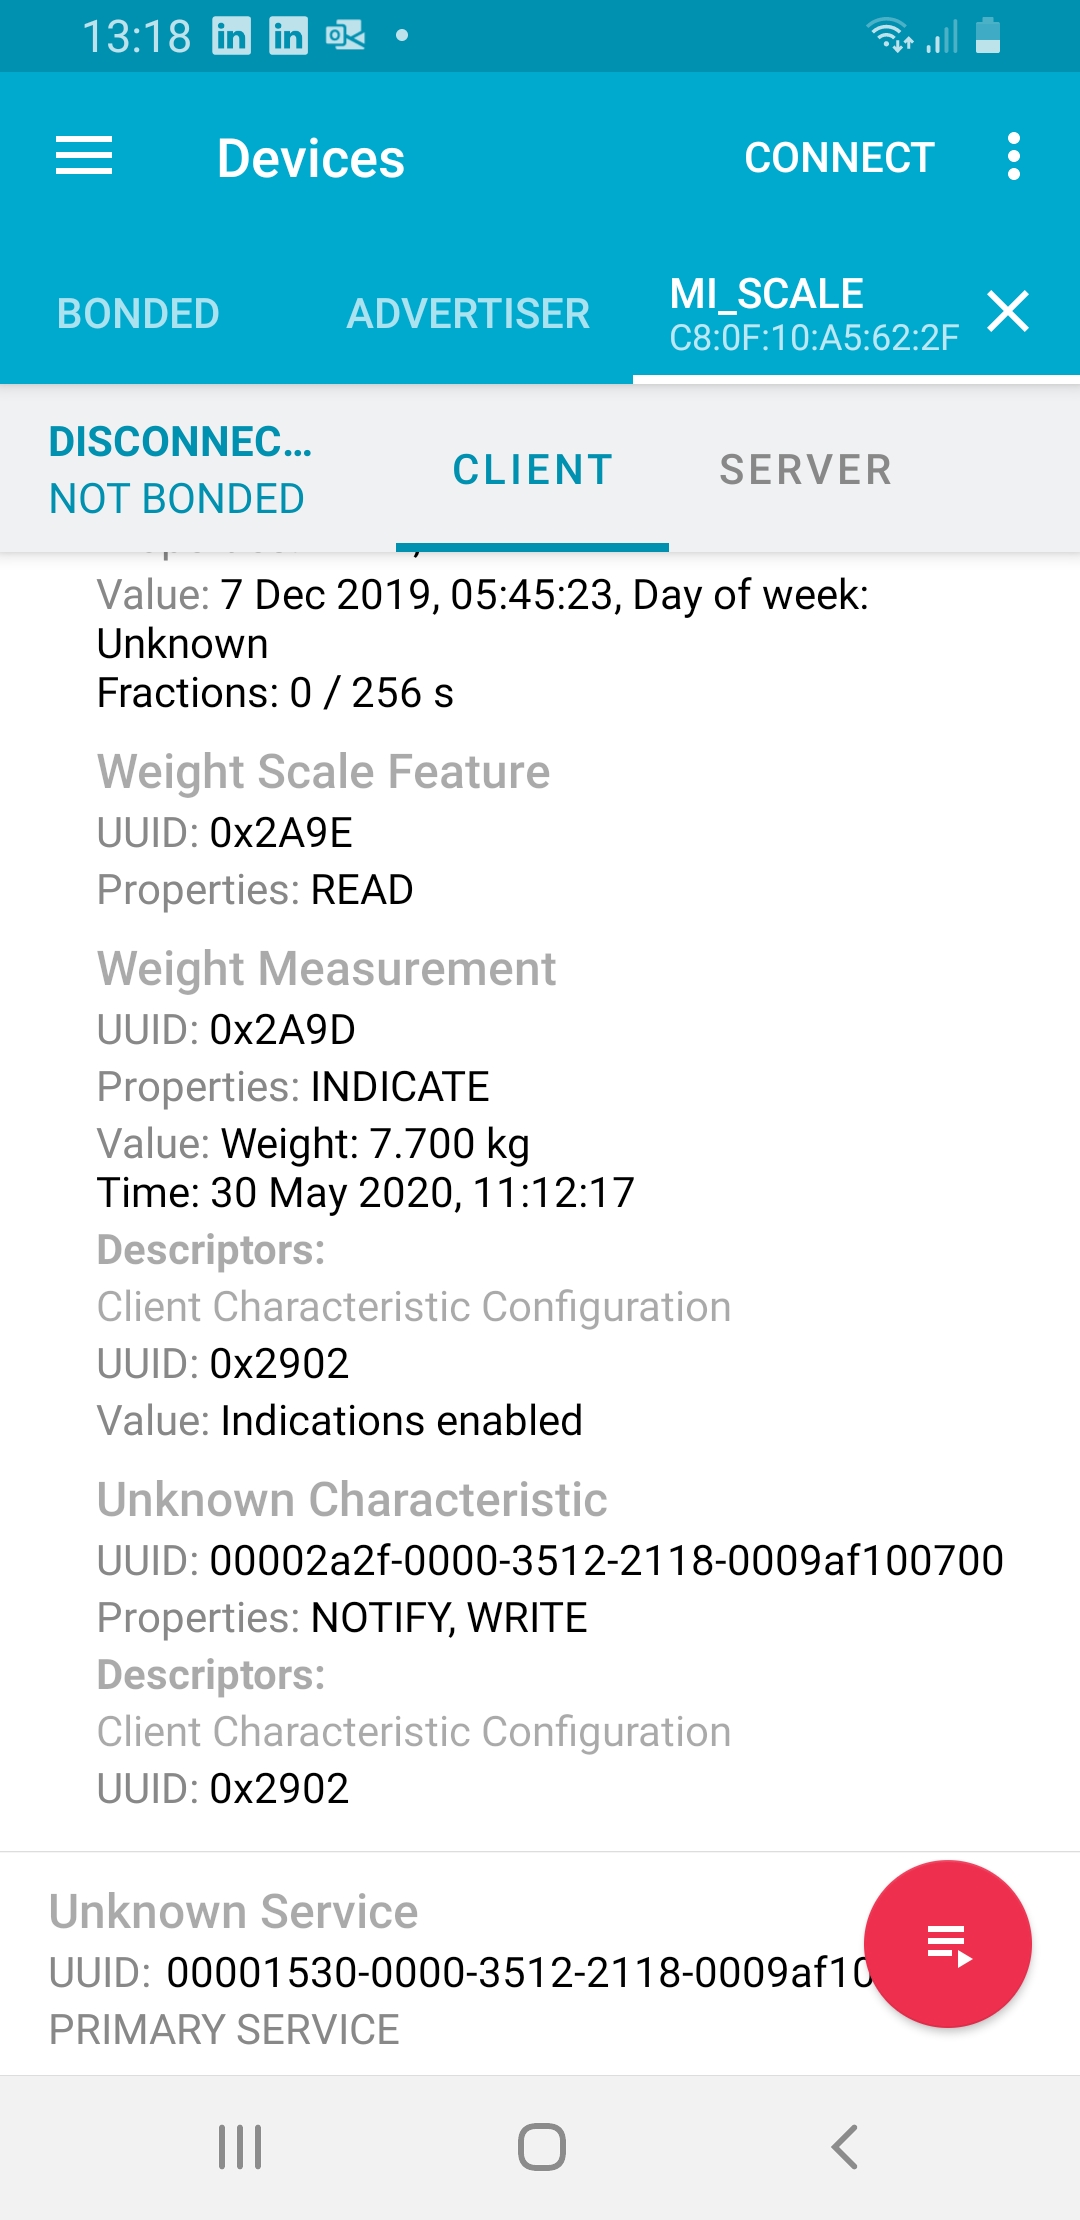
So, if you comment out the condition to avoid checking if the characteristic is notifiable or not, and set the callback function anyway, you will received calls in the callback function with the parameter isNotify set to false.

Make your WOL configuration TRULY sticky

Introduction

The typical steps to make your Ubuntu server wake on LAN are:

  • Find your network card interface name
  • Check your network card capabilities
  • Use ethtool to set “Wake-on” option to “g” value

And that’s all, then you put your server in suspend or hibernate mode and wake it up remotely. It works like a charm, but then you try a second time, you hibernate the server again and… it doesn’t wake remotely.

What happened, is that you didn’t repeat the third step to set again the “Wake-on” option to “g” value. The value you set for the network interface is volatile and you have to repeat the third step on each boot… unless you make it sticky.

Setup the network interface to work just once

1.- Find your network card interface name

sudo ip a
1: lo: <LOOPBACK,UP,LOWER_UP> mtu 65536 qdisc noqueue state UNKNOWN group default qlen 1000
    link/loopback 00:00:00:00:00:00 brd 00:00:00:00:00:00
    inet 127.0.0.1/8 scope host lo
       valid_lft forever preferred_lft forever
    inet6 ::1/128 scope host
       valid_lft forever preferred_lft forever
2: enp3s0: <NO-CARRIER,BROADCAST,MULTICAST,UP> mtu 1500 qdisc fq_codel state DOWN group default qlen 1000
    link/ether e8:94:f6:08:5a:60 brd ff:ff:ff:ff:ff:ff
3: eno1: <BROADCAST,MULTICAST,UP,LOWER_UP> mtu 1500 qdisc fq_codel state UP group default qlen 1000
    link/ether c8:9c:dc:2b:aa:48 brd ff:ff:ff:ff:ff:ff
    inet 192.168.16.126/24 brd 192.168.16.255 scope global noprefixroute eno1
       valid_lft forever preferred_lft forever
    inet6 fe80::ca9c:dcff:fe2b:aa48/64 scope link
       valid_lft forever preferred_lft forever

In my case, the server has three interfaces:

1: lo (the local loopback)

2: enp3s0: one 100Mbps ethernet card (not being used)

3: eno1: one 1Gbs ethernet card (this is the one I want to use to wake the system remotely, as it is the one configured to connect to my LAN). I will copy two values:

Interface name: eno1 (be aware of one (1) and lowercase L (l)). Usually interface name ends with a number, not a letter.

MAC address: e8:94:f6:08:5a:60

Now we know the interface name, we will check the Wake-on capabilities:

sudo ethtool eno1
Settings for eno1:
        Supported ports: [ TP ]
        Supported link modes:   10baseT/Half 10baseT/Full
                                100baseT/Half 100baseT/Full
                                1000baseT/Full
        Supported pause frame use: No
        Supports auto-negotiation: Yes
        Supported FEC modes: Not reported
        Advertised link modes:  10baseT/Half 10baseT/Full
                                100baseT/Half 100baseT/Full
                                1000baseT/Full
        Advertised pause frame use: No
        Advertised auto-negotiation: Yes
        Advertised FEC modes: Not reported
        Speed: 1000Mb/s
        Duplex: Full
        Port: Twisted Pair
        PHYAD: 1
        Transceiver: internal
        Auto-negotiation: on
        MDI-X: off (auto)
        Supports Wake-on: pumbg
        Wake-on: d
        Current message level: 0x00000007 (7)
                               drv probe link
        Link detected: yes

Take a look at the last lines. We are looking for two different lines:

Supports Wake-on: pumbg

and

Wake-on: d

The “Wake-on” mode configured by default is “d”, which means that the network card will not switch on the server when it receives a magic packet but, as the network interface supports “g” mode (it is one the letters in pumbg) we can set the value of “Wake-on” to “g”.

We will use ethtool for this. If it is not already installed on your system, do it:

sudo ethtool -s eno1 wol g

Now, if you repeat the step to check your network card capabilities (ethtool eno1) you shoud see the “Wake-on” option set to “g” value.

That means your server is ready to sleep and wake remotely.

Put the server into hibernation mode:

sudo systemctl hibernate

And now wake it remotely using one of the many available tools. Depending on the platform you will use an Android, Windows, Linux, … tool for this purpose and the only thing you will need is the MAC address you copied some steps above.

If everything went right, your server has woken, but what if you repeat the previous steps? (hibernate – remotely wake) It doesn’t work.

As I mentioned in the introduction, the value you configure in the “Wake-on” option of your network card is volatile. Each time you reboot your server it resets its value (usually to “d”).

Make your configuration sticky

We will create a system service to set the “Wake-on” value to “g” each time the server boots or restart.

There are a lot of recipes for these, but most of them didn’t work in my case. I’ll tell you one configuration line that did the trick for me.

1.- Create the .service file using your favourite editor

sudo nano /etc/systemd/system/wol.service

Now, copy the next content inside the file (change the name of the interface card and set the description you prefer):

[Unit]
Description=Activate WOL on eno1 network card
After=network-online.target

[Service]
Type=oneshot
ExecStart=/sbin/ethtool -s eno1 wol g

[Install]
WantedBy=basic.target

Save the file (^O + ENTER + ^X)

Now we will start the service for the first time

sudo service wol start

And check its status

sudo service wol status

● wol.service - Activate Wake On LAN
   Loaded: loaded (/etc/systemd/system/wol.service; enabled; vendor preset: enabled)
   Active: inactive (dead) since Sat 2020-05-09 12:55:26 CEST; 2min 8s ago
  Process: 1706 ExecStart=/sbin/ethtool -s eno1 wol g (code=exited, status=0/SUCCESS)
 Main PID: 1706 (code=exited, status=0/SUCCESS)

may 09 12:55:26 estudios-srv systemd[1]: Starting Activate Wake On LAN...
may 09 12:55:26 estudios-srv systemd[1]: wol.service: Succeeded.
may 09 12:55:26 estudios-srv systemd[1]: Started Activate Wake On LAN.

You will notice the service is dead or inactive. This is normal because it is not actually a service and it is not running like a daemon, it starts,  do whatever it has to do and finishes.

If we restart the server now, our service entry will not run at startup because we haven’t enabled it. To do so:

sudo systemctl enable wol.service

Now, you can restart the server and it will wake remotely because “Wake-on: g” should be already set when it boots.

The explanation to “TRULY sticky”

But, why did I titled my post with a “TRULY sticky”?. Well, the reason is that all the recipes I’ve found to do this didn’t work. After rebooting, always the “d” value was set for the “Wake-on” option.

In fact it is not a problem of executing the configuration or not. Although the service entry run on every reboot, it was doing it before the network card was available to be configured.

So, the problem is when to run the network card configuration.

That’s the reason you should put this line in you .service file:

After=network-online.target

To make sure it configures the network card when it’s really available.

I hope it to work for you too.

How to invoke a Qlik Sense task from the command line

If you use Qlik Sense, eventually you will need to automate the execution of the data loading tasks.

Qlik Sense implements a REST API to make this and much more things. It is called Qlik Sense Repository Service API or QRS API

There are several ways to authenticate our calls to the server. Here we will use a server certificate instead of Windows or HTTP Header Authentication.

To export the server certificates, we need to access the QMC console with admin privileges. Once you are logged into the QMC, click in the last option on the left menu “Certificates”.

Exporting Qlik Sense server certificatesYou will need to enter a machine name and also a password if you want to protect your certificate. Remember, if you don’t specify a password, anyone who has access to the certificate file will have the capabilities of an admin via the Qlik Sense API.

Change the file format of the certificate to .pem and note the location where the .zip file that contains the certificates will be saved.

If you go now to the folder mentioned above and everything went ok, you will find a zip file. Unzip the file and copy both files inside (client.pem & client_key.pem) into a safe folder or an usb pen that we will reference later. 

Now, let’s go to our Linux station to create the utility script that we can use to start Qlik Sense tasks.

Of course, the Qlik Sense server has to be accessible from this station.

1.- Create a folder to store both the script and the certificate files

mkdir /opt/qliktasks

2.- Access the new folder and create a new one to store the certificate files

cd /opt/qliktasks

mkdir cert

3.- Copy the cert files from your usb device or the folder where you stored them before. Once you’ve finished, there should be two files inside the cert folder you created in step 2.

/opt/qliqtasks/cert/client.pem

/opt/qliqtasks/cert/client_key.pem

4.- Now, let’s create the sh script:

4.1.- Inside /op/qliktasks folder open nano or vim to create the file taskStart.sh

nano taskStart.sh

4.2.- Make up a 16 characters long key that you will specify later in the query string and a header of the curl request. For instance:

MySixteenLongKey

1234567890123456

4.3- Copy the following content inside the file updating the files path and the 16 long key. This is a very important step because the files need to be specified with an absolute path.

#!/bin/bash

curl --key /opt/qliqtasks/cert/client_key.pem \
--cert /opt/qliqtasks/cert/client.pem \
--insecure \
-X POST \
https://myserver.intra.net:4242/qrs/task/$1/start?xrfkey=MySixteenLongKey \
--header "Content-type:application/json" \
--header "x-qlik-xrfkey: MySixteenLongKey" \
--header "X-Qlik-User: UserDirectory=internal;UserId=sa_repository" \
-d ""

4.4.- Save the file (CTRL + O), confirm and exit (CTRL + X) the editor

4.5.- Activate execution flag

chmod +x startTask.sh

5.- Now we are ready to execute a Qlik Sense task by specifying its UUID.

./startTask.sh e12ed06d-9124-4772-a07d-60cc06f05521

How to find the task UUID?

Go to QMC tasks panel and find the column menu in the top right corner. Simply activate the ID checkbox and copy from the new column the UUID of the task you need to invoke.

Qlik Sense Task Column Menu

Xbox 360 Kinect & Windows 10

Buying a second-hand Kinect is a cheap option to get a 3D scanning capable device. Though it is not designed specifically for that purpose it can, using the right application, create a 3D model of an object, a room or a person.

I’ve tried several times to install the XBOX 360 Kinect to my Windows PC with no success, but finally, I’ve made it work.

Xbox 360 Kinect
Xbox 360 Kinect

There is a Windows version of Kinect. It costs about 155€ and I guess it is easier to install on a PC, but I had no intention to expend that money while there are second-hand units for about 20€. A friend of mine bought one for 6€!

What do you need to connect the Xbox device to Windows? You need an adapter that you can order to Amazon and it costs only 12€.

Kinect adapter for PC

The converter just feeds with some extra current to our Xbox Kinect and also adapts the Xbox plug to a standard USB 3.0.

There are no more hardware requirements. All you need is to install the software to make it work, and at that point is where I got in troubles.

If you read the available tutorials on the web, the first step is installing Kinect for Windows SDK and after that connecting your Kinect to any USB 3.0 port. The device should be autodetected and de Kinect devices (camera, audio, and motor) will be shown on the Windows Device Manager.

Instead of that, what I got after installing was this:

Xbox NUI Motor
Xbox NUI Motor

If this is also your case and you installed the latest version of Kinect for Windows SDK (version 2.0), try the following:

  1. Unplug the Kinect from the USB 3.0 port
  2. Remove the version 2.0 software (It is advisable though I didn’t remove it from my computer)
  3. Install the previous version of Kinect for Windows SDK (version 1.8):
    1. You can find it at the Microsoft Site
    2. or you can download it from here if it is not available there.
  4. Plug the Kinect again in
  5. The correct drivers will be now installed
Kinect for Windows Devices

What todo do after that?

Kinect for Windows Developer Toolkit
  • Scan an object or even yourself to make a 3D printing
    • Skanect is a very good choice, but the free version only allows exporting a limited number of polygons. Nonetheless, the result is at least curious and you can recognize yourself though you print it using Blue Sky PLA)
      Skanect Scanner
      Skanect Scanner
    • Reconstructme is also a good option, though is less straight and I think it is more focussed on making a virtual color model of the object.
      Reconstructme while Scanning
      Reconstructme while Scanning

Both Recostructme and Skannect will allow you to export a .obj or .stl file and then you can post-process it with the application of your election. 

Xbox 360 Kinect
Xbox 360 Kinect and Skanect

BQ Easy Go & Ender 3

I’m quite happy with BQ Easy Go PLA filament. I have been using it during these last days and had no problem at all, but it is also true that I read some comments in Amazon before using it and there is an issue with this filament and Creality Ender 3 printers:

There is a big logo in one of the sides of the coil. It may occur that this logo gets stuck in the coil guide of the Ender 3.

BQ Logo in coil side

The easiest solution I found for this was printing a ring to prevent the coil from getting too close to the printer guide.

Separation ring
Separation ring
Separation ring mounted

You can find the ring files in Security ring for Ender 3 and BQ filament at Thingiverse.


Breadboard adapter for ESP32 dev. board

It is frustrating the first time you insert an ESP32 dev board into a breadboard and you notice there’s no room for wires.

ESP Dev Board on Breadboard

What I usually do is putting a breadboard aside another one, but I don’t like it very much.

Workaround for ESP Dev Board on breadbord
Workaround for ESP Dev Board on two breadboards

I decided then to split the small board into two pieces and insert them in a 3D printed base so that the dev board pins get into the first row of holes and the rest remain available.

Splitted breadboard
Split breadboard
ESP32 Dev Board on split breadboard
ESP32 Dev Board on the split breadboard
Breadboard splitter design
Breadboard splitter

.stl file available at www.thingiverse.com

Breadboard Splitter
Breadboard Splitter
Breadboard Splitter side view
Breadboard Splitter top view