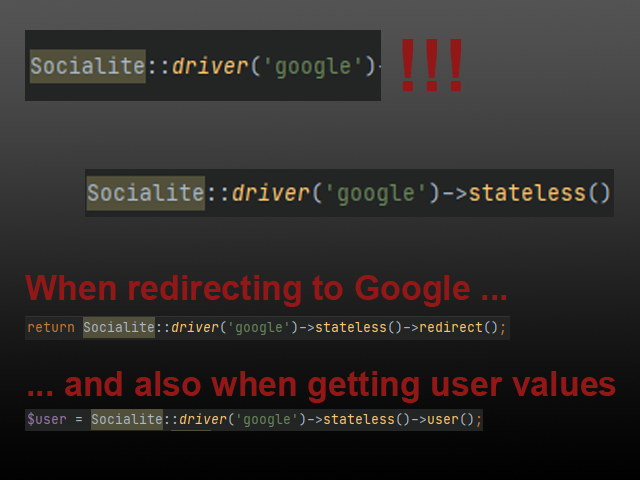
After struggling for three hours, and making a useless bunch of changes in my code and server configuration, I finally found the solution to this:
When you finish your coding, and test it in your localhost deployment, you can login using Google and there’s no problem in getting all the user profile information.
Then you deploy the application in your cloud server environment and a “no message” error appears and doesn’t allow you to log into your application.
Laravel Socialite Google Login Error with No Message
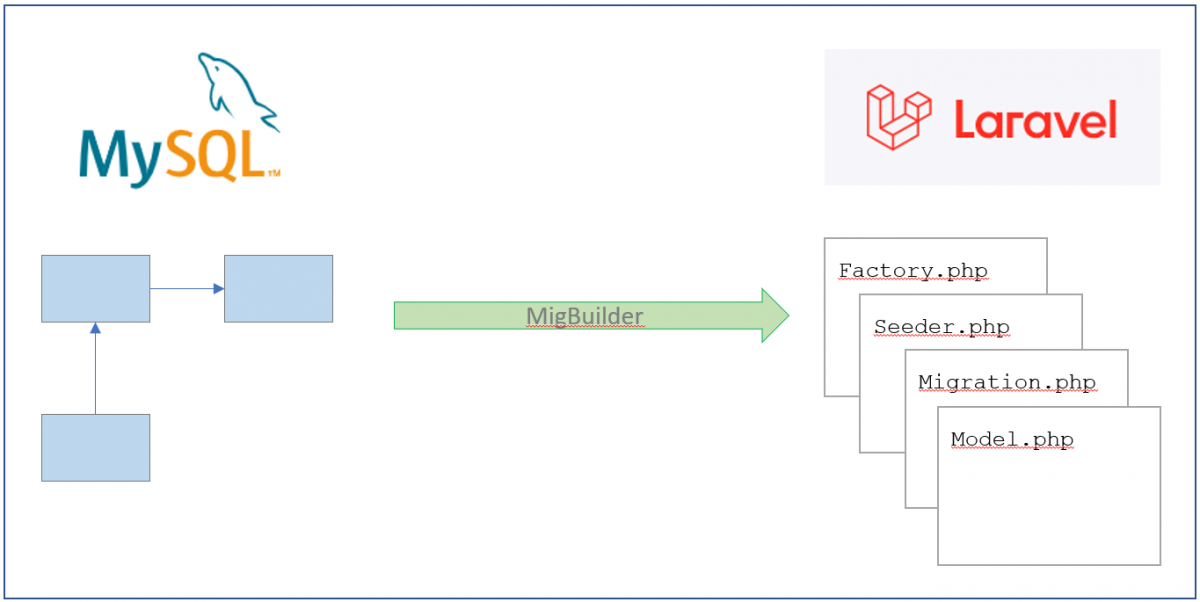
MigBuilder is a tool to reverse engineer a MySQL database into Models, Factories, Seeders & Migrations files for Laravel Eloquent ORM.
MigBuilder is a tool to reverse engineer a MySQL database into Models, Factories, Seeders & Migrations files for Laravel Eloquent ORM.
It reads the database structure and completes as much code as possible to ease the model generation in Laravel.
Unless the model is structured exactly as expected, the code files will contain non accurate lines or declarations. So it is ALWAYS recommended to check the code once is generated.
The ‘perfect’ tables definition is:
Tables should contain a single column primary key, better if its name is ‘id’
Relationships have to be declared and always be composed of one single column
Not frequent datatypes (binary, longtext, …) have not been tested yet
INSTALLATION
composer require pangodream/migbuilder
USAGE
php artisan migbuilder originschema
Migbuilder will read originschema database (originschema is the connection name in Laravel config/app.php file) and will generate the migration, model, seeder and factory files for each of the tables A good practice is two have two different connections declared in Laravel config/database.php file:
One alternative connection pointing to the existing database to be reverse engineered
The main connection that will be used to deploy migrate files and use models in
CAUTION: If you use the command above and any of the generated files already exists, the generation will not begin unless you specify the overwrite (–overwrite) parameter. Notice that using overwrite will destroy the information you have in any of your files having the same name.
NOTE: Migbuilder is not an error free code generator, but a help to save hand code lines, so you should review the generated code in every case.
I hope it to help you and if you have any comment, please let me know.
Sample generated files:
Source DDL
CREATE TABLE product (
id INT(11) NOT NULL,
name VARCHAR(45) NOT NULL DEFAULT '',
slug VARCHAR(45) NOT NULL DEFAULT '',
description VARCHAR(45) NOT NULL DEFAULT '',
price VARCHAR(45) NOT NULL DEFAULT '',
subcategory_id INT(11) NOT NULL DEFAULT '0',
brand_id INT(11) NOT NULL DEFAULT '0',
quantity VARCHAR(45) NOT NULL DEFAULT '0',
PRIMARY KEY (id),
INDEX FK_products_subcategories (subcategory_id),
INDEX FK_products_brands (brand_id),
CONSTRAINT FK_products_brands FOREIGN KEY (brand_id) REFERENCES brand (id),
CONSTRAINT FK_products_subcategories FOREIGN KEY (subcategory_id) REFERENCES subcategory (id)
)
COLLATE='utf8_general_ci'
ENGINE=InnoDB;
Migration file
<?php
/* Generated automatically using MigBuilder by Pangodream */

use Illuminate\Database\Migrations\Migration;
use Illuminate\Database\Schema\Blueprint;
use Illuminate\Support\Facades\Schema;

class CreateProductTable extends Migration
{

    /**
     * Run the migrations.
     *
     * @return void
     */
    public function up()
    {
        Schema::create('product', function (Blueprint $table) {
            $table->id('id');
            $table->string('name', 45)->default('');
            $table->string('slug', 45)->default('');
            $table->string('description', 45)->default('');
            $table->string('price', 45)->default('');
            $table->unsignedBigInteger('subcategory_id')->default(0);
            $table->unsignedBigInteger('brand_id')->default(0);
            $table->string('quantity', 45)->default('0');
            $table->timestamps();

            // Indexes
            $table->index('id');

            // Constraints & Foreign Keys
            $table->foreign('subcategory_id')->references('id')->on('subcategory');
            $table->foreign('brand_id')->references('id')->on('brand');
        });
    }

    /**
     * Reverse the migrations.
     *
     * @return void
     */
    public function down()
    {
        Schema::disableForeignKeyConstraints();
        Schema::dropIfExists('product');
        Schema::enableForeignKeyConstraints();
    }

}
Model file
<?php
/* Generated automatically using MigBuilder by Pangodream */

namespace App\Models;

use Illuminate\Database\Eloquent\Factories\HasFactory;
use Illuminate\Database\Eloquent\Model;

class Product extends Model
{
    use HasFactory;
    protected $table = 'product';

    // Fillables (remove the columns you don't need)
    protected $fillable = ['id', 'name', 'slug', 'description', 'price', 'subcategory_id', 'brand_id', 'quantity', ];

    // Parent relationships (change belongsTo to belongsToMany or similar if needed)
    public function Subcategory(){
        return $this->belongsTo(Subcategory::class);
    }
    public function Brand(){
        return $this->belongsTo(Brand::class);
    }
    // Child relationships (change hasMany to hasOne or similar if needed)
    public function ColorProduct(){
        return $this->hasMany(ColorProduct::class);
    }
    public function Size(){
        return $this->hasMany(Size::class);
    }

}
Seeder file
<?php
/* Generated automatically using MigBuilder by Pangodream */

namespace Database\Seeders;

use Illuminate\Database\Seeder;
use App\Models\Product;

class ProductSeeder extends Seeder
{
    /**
     * Run the database seeds.
     *
     * @return void
     */
    public function run()
    {
    // Record sample structure
    $product = [
        //'id' =>  ,
        //'name' => '',
        //'slug' => '',
        //'description' => '',
        //'price' => '',
        //'subcategory_id' =>  ,
        //'brand_id' =>  ,
        //'quantity' => '',
    ];

    }
}
Factory file
<?php
/* Generated automatically using MigBuilder by Pangodream */

namespace Database\Factories;

use Illuminate\Database\Eloquent\Factories\Factory;
use App\Models\Product;

class ProductFactory extends Factory
{
    protected $model = Product::class;
    /**
     * Define the model's default state.
     *
     * @return array
     */
    public function definition()
    {
        return [
            //
        ];
    }
}
If you are reading this I guess you know what Composer and Packagist are and probably you need to know how to build your own package or you just simply don’t remember all the steps to do it.
Otherwise, you can get some very basic info of Composer here: Wikipedia Composer and if you want to dive into the documentation then you can visit Composer Documentation page. Packagist is the main repository for Composer packages.
Preparation
We will create a package and before writing a line of code, we will compile some basic information. I’m using mine as an example.
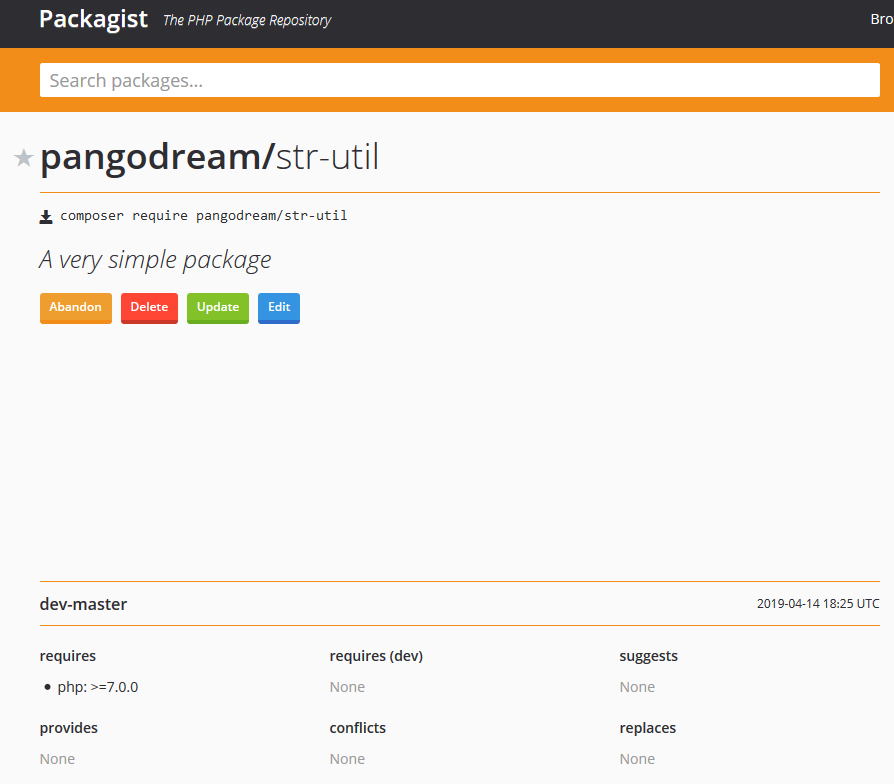
Developer name / Organization: pangodream
Package name: str-util
Description: A very simple package
Setting up the project for the package
Create the project folder
In our case, the project folder will be str-util
Create two more folders inside the project one; one for the package code and the other one for testing. The folder structure should be:
str-util
    /src
    /test
Create composer.json file
Access the project folder and create composer.json by typing
> composer init
Composer will try to guess some of the configuration values
Once we confirm the file generation, a composer.json file will be in our project folder and it will contain some very similar to this:
So, this is now the content of our project folder:
str-util
    composer.json
    /src
    /test
Edit to complete composer.json
We will add some information about autoloading (“autoload”) and also tell composer our dependencies (“require”). For instance, which is the minimum version of PHP that our library needs to work.
Inside the composer.json file, we told composer the path were StrUtil package classes are. So, each time we reference in our code a class qualified with its package name Composer will look into the composer.json file to know where that class file is.
In our case, the package name is StrUtil and the class is Counter (because our class will contain some methods to count words, paragraphs, letters, …).
Inside src folder, let’s create a new folder for our package with the name we gave it inside composer.json: StrUtil, and inside that folder, we will place one of our package classes file. Now, we have this folder hierarchy
/str-util
    /src
        /StrUtil
            /Counter.php
So, when PHP finds a reference to a class with the ‘use’, it will look into composer.json. For instance, let’s say we have a line of code like this
use StrUtil\Counter;
What composer.json file indicates is that StrUtil package is under src folder
"autoload": {
        "psr-0": {
            "StrUtil": "src/"
        }
    }
So, the Counter.php file containing the Counter class code should be located in
src/StrUtil/Counter.php
Now we know how the class file is located and loaded, let’s write down the code:
<?php
/**
 * Created by Pangodream.
 * Date: 14/04/2019
 * Time: 18:50
 */

namespace StrUtil;


class Counter
{
    /**
     * @param string $text The text we want to count the number of words it consist of
     * @return int The number of words in text
     */
    public static function countWords(string $text){
        /** @var int $count To store the result of counting words in text */
        $count = 0;
        //Clean up the string
        $text = trim($text);
        /** @var array $words Array containing the words */
        $words = explode(" ", $text);
        //Array size is the number of words in text
        $count = sizeof($words);
        return $count;
    }
}
And now we know how to reference that class, let’s create a test file to verify that our class works. We will name this file testStrUtil.php and save it inside the test folder we created before:
str-util
    /test
        /testStrUtil.php
<?php
/**
 * Created by Pangodream.
 * Date: 14/04/2019
 * Time: 19:03
 */

//Use composer autoload to load class files
require_once __DIR__ . "/../vendor/autoload.php";

//Required package/libraries
use StrUtil\Counter;

$text = "Aequam memento rebus in arduis servare mentem";
$wordCount = Counter::countWords($text);
echo "The txt contains ".$wordCount." word(s)\r\n";
Testing our package
From the str-util folder, we are going to invoke the test PHP file and see what happens:
str-util> php test/testStrUtil.php
The text contains 7 word(s)
Our package containing only a class is working and now we are ready to publish it.
Repository part: github.com
The next thing we’ll do is creating a new repository with our GitHub account.
Create the repository at github.com
Go to github.com and create a new repository called str-util. It is a good practice to give a repository description and also initialize with a README file. Because you are going to share the package in packagist.org you need to Add a license file, in our case an MIT License.
Add package files to the repository
Now we will make an initial commit to our repository with the files we already have created inside the src folder.
From the str-util folder, execute the following commands:
---->str-util> git init
Initialized empty Git repository in C:/cli/str-util/.git/

---->str-util> git add src
---->str-util> git add composer.json

---->str-util> git commit -m "Initial commit"
[master (root-commit) af7bbac] Initial commit
 2 file changed, 28 insertions(+)
 create mode 100644 src/StrUtil/Counter.php
 create mode 100644 composer.json

---->str-util> git remote add origin https://github.com/YOUR_USER_NAME/str-util.git

---->str-util> git pull origin master --allow-unrelated-histories
From https://github.com/YOUR_USER_NAME/str-util
 * branch            master     -> FETCH_HEAD
Merge made by the 'recursive' strategy.
 README.md | 2 ++
 1 file changed, 2 insertions(+)
 create mode 100644 README.md

---->str-util> git push origin master
fatal: HttpRequestException encountered.
   Error al enviar la solicitud.
Username for 'https://github.com': YOUR_USER_NAME
Password for 'https://YOUR_USER_NAME@github.com':
Counting objects: 7, done.
Delta compression using up to 4 threads.
Compressing objects: 100% (4/4), done.
Writing objects: 100% (7/7), 928 bytes | 309.00 KiB/s, done.
Total 7 (delta 0), reused 0 (delta 0)
To https://github.com/YOUR_USER_NAME/str-util.git
   16f9ce1..8f91cfa  master -> master
Let’s analyze what we have done:
git init
Initialize the Git repository in our local directory. Git will create its hidden files to control operations made on the repository.
git add src

git add composer.json
We are telling Git which files we want to add to the repository. In our case only the src folder and the composer.json file will be synchronized, the rest of the files will stay only in our local machine.
git commit -m "Initial commit"
Our first Initial commit to our local instance of the repository. We haven’t sent anything to github.com until now.
Now we will add an origin (origin means remote repository) to our local repository. This is the reference to our github.com repository. Replace YOUR_USER_NAME with your own Github user name.
If at this point we try to push (send to remote) the commit we made locally, an error will occur because in the remote instance of the repository there are files that don’t exist locally (README file for instance). We cannot send and receive at the same time under normal circumstances, so we will first pull files from origin ignoring possible conflicts:
Useful for single quick operations on a host (like sending a command)
/**
 * Sends data over TCP/IP to the specified host
 * and returns host reply (limited to 1024 chars)
 * @param string $hostIP
 * @param int $hostPort
 * @param string $data
 * @return string
 */
private function sendDataToHost(string $hostIP, int $hostPort, string $data){
    $socket = socket_create(AF_INET, SOCK_STREAM, SOL_TCP);
    $resp = "";
    if(!is_resource($socket)){
        try{
            socket_connect($socket, $hostIP, $hostPort);
            socket_write($socket, $data);
            $resp = socket_read($socket, 1024);
        }catch(\Exception $e){
            //Error while connecting socket
        }
        socket_close($socket);
    }else{
        //Error creating the socket
    }
    return $resp;
}
This website uses cookies to improve your experience. We'll assume you're ok with this, but you can opt-out if you wish.AcceptReject
Privacy & Cookies Policy
Privacy Overview
This website uses cookies to improve your experience while you navigate through the website. Out of these, the cookies that are categorized as necessary are stored on your browser as they are essential for the working of basic functionalities of the website. We also use third-party cookies that help us analyze and understand how you use this website. These cookies will be stored in your browser only with your consent. You also have the option to opt-out of these cookies. But opting out of some of these cookies may affect your browsing experience.
Necessary cookies are absolutely essential for the website to function properly. This category only includes cookies that ensures basic functionalities and security features of the website. These cookies do not store any personal information.
Any cookies that may not be particularly necessary for the website to function and is used specifically to collect user personal data via analytics, ads, other embedded contents are termed as non-necessary cookies. It is mandatory to procure user consent prior to running these cookies on your website.