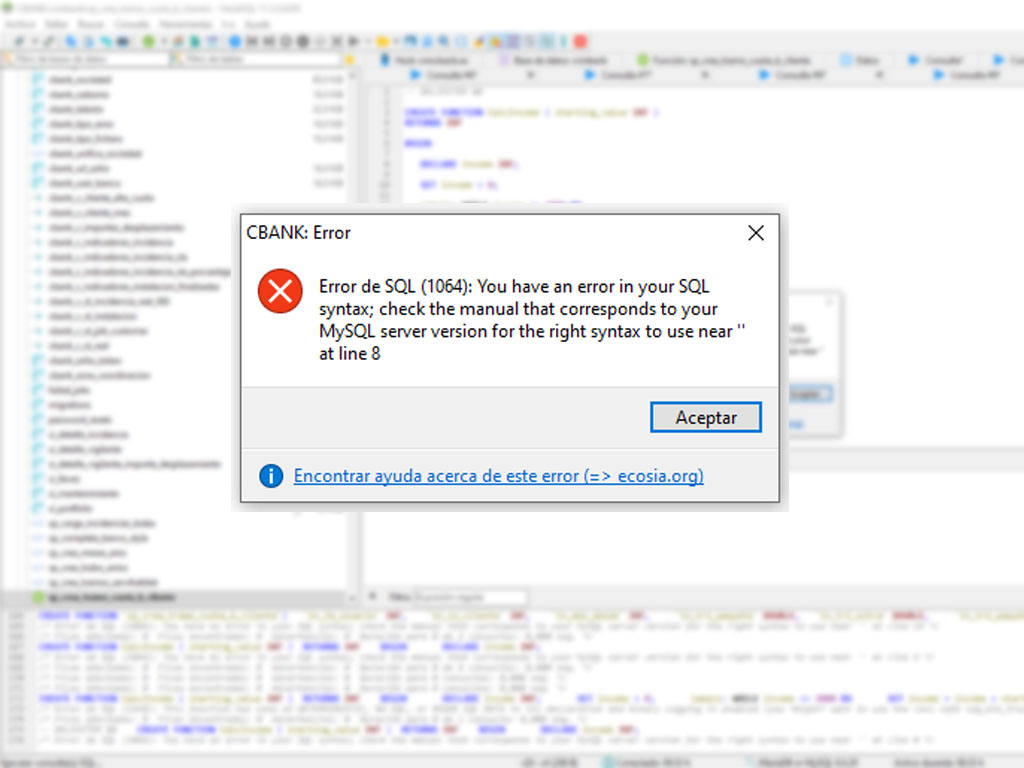
No matter how simple you define your function, its creation will fail when using HeidiSQL interface.
CREATE FUNCTION `fn_my_function`(
    `parameter_a` INT
)
RETURNS INT
LANGUAGE SQL
DETERMINISTIC
CONTAINS SQL
SQL SECURITY DEFINER
COMMENT ''
BEGIN
   return 0;
END
After reviewing your code, you can’t find any syntax error. You try to fix it by removing the COMMENT ” line, but nothing seems to work.
The solution is quite simple:
Tell the SQL engine a new DELIMITER:
DELIMITER //
After the END; line, add another one to restore the DELIMITER to ;
DELIMITER ;
That’s all
DELIMITER //

CREATE FUNCTION `fn_my_function`(
    `parameter_a` INT
)
RETURNS INT
LANGUAGE SQL
DETERMINISTIC
CONTAINS SQL
SQL SECURITY DEFINER
COMMENT ''
BEGIN
   return 0;
END

DELIMITER ;
Please note that there is a space separator between DELIMITER and ;
And that’s all, then you put your server in suspend or hibernate mode and wake it up remotely. It works like a charm, but then you try a second time, you hibernate the server again and… it doesn’t wake remotely.
What happened, is that you didn’t repeat the third step to set again the “Wake-on” option to “g” value. The value you set for the network interface is volatile and you have to repeat the third step on each boot… unless you make it sticky.
Setup the network interface to work just once
1.- Find your network card interface name
sudo ip a
1: lo: <LOOPBACK,UP,LOWER_UP> mtu 65536 qdisc noqueue state UNKNOWN group default qlen 1000
    link/loopback 00:00:00:00:00:00 brd 00:00:00:00:00:00
    inet 127.0.0.1/8 scope host lo
       valid_lft forever preferred_lft forever
    inet6 ::1/128 scope host
       valid_lft forever preferred_lft forever
2: enp3s0: <NO-CARRIER,BROADCAST,MULTICAST,UP> mtu 1500 qdisc fq_codel state DOWN group default qlen 1000
    link/ether e8:94:f6:08:5a:60 brd ff:ff:ff:ff:ff:ff
3: eno1: <BROADCAST,MULTICAST,UP,LOWER_UP> mtu 1500 qdisc fq_codel state UP group default qlen 1000
    link/ether c8:9c:dc:2b:aa:48 brd ff:ff:ff:ff:ff:ff
    inet 192.168.16.126/24 brd 192.168.16.255 scope global noprefixroute eno1
       valid_lft forever preferred_lft forever
    inet6 fe80::ca9c:dcff:fe2b:aa48/64 scope link
       valid_lft forever preferred_lft forever
In my case, the server has three interfaces:
1: lo (the local loopback)
2: enp3s0: one 100Mbps ethernet card (not being used)
3: eno1: one 1Gbs ethernet card (this is the one I want to use to wake the system remotely, as it is the one configured to connect to my LAN). I will copy two values:
Interface name: eno1 (be aware of one (1) and lowercase L (l)). Usually interface name ends with a number, not a letter.
MAC address: e8:94:f6:08:5a:60
Now we know the interface name, we will check the Wake-on capabilities:
sudo ethtool eno1
Settings for eno1:
        Supported ports: [ TP ]
        Supported link modes:   10baseT/Half 10baseT/Full
                                100baseT/Half 100baseT/Full
                                1000baseT/Full
        Supported pause frame use: No
        Supports auto-negotiation: Yes
        Supported FEC modes: Not reported
        Advertised link modes:  10baseT/Half 10baseT/Full
                                100baseT/Half 100baseT/Full
                                1000baseT/Full
        Advertised pause frame use: No
        Advertised auto-negotiation: Yes
        Advertised FEC modes: Not reported
        Speed: 1000Mb/s
        Duplex: Full
        Port: Twisted Pair
        PHYAD: 1
        Transceiver: internal
        Auto-negotiation: on
        MDI-X: off (auto)
        Supports Wake-on: pumbg
        Wake-on: d
        Current message level: 0x00000007 (7)
                               drv probe link
        Link detected: yes
Take a look at the last lines. We are looking for two different lines:
Supports Wake-on: pumbg
and
Wake-on: d
The “Wake-on” mode configured by default is “d”, which means that the network card will not switch on the server when it receives a magic packet but, as the network interface supports “g” mode (it is one the letters in pumbg) we can set the value of “Wake-on” to “g”.
We will use ethtool for this. If it is not already installed on your system, do it:
sudo ethtool -s eno1 wol g
Now, if you repeat the step to check your network card capabilities (ethtool eno1) you shoud see the “Wake-on” option set to “g” value.
That means your server is ready to sleep and wake remotely.
Put the server into hibernation mode:
sudo systemctl hibernate
And now wake it remotely using one of the many available tools. Depending on the platform you will use an Android, Windows, Linux, … tool for this purpose and the only thing you will need is the MAC address you copied some steps above.
If everything went right, your server has woken, but what if you repeat the previous steps? (hibernate – remotely wake) It doesn’t work.
As I mentioned in the introduction, the value you configure in the “Wake-on” option of your network card is volatile. Each time you reboot your server it resets its value (usually to “d”).
Make your configuration sticky
We will create a system service to set the “Wake-on” value to “g” each time the server boots or restart.
There are a lot of recipes for these, but most of them didn’t work in my case. I’ll tell you one configuration line that did the trick for me.
1.- Create the .service file using your favourite editor
sudo nano /etc/systemd/system/wol.service
Now, copy the next content inside the file (change the name of the interface card and set the description you prefer):
[Unit]
Description=Activate WOL on eno1 network card
After=network-online.target

[Service]
Type=oneshot
ExecStart=/sbin/ethtool -s eno1 wol g

[Install]
WantedBy=basic.target
Save the file (^O + ENTER + ^X)
Now we will start the service for the first time
sudo service wol start
And check its status
sudo service wol status

● wol.service - Activate Wake On LAN
   Loaded: loaded (/etc/systemd/system/wol.service; enabled; vendor preset: enabled)
   Active: inactive (dead) since Sat 2020-05-09 12:55:26 CEST; 2min 8s ago
  Process: 1706 ExecStart=/sbin/ethtool -s eno1 wol g (code=exited, status=0/SUCCESS)
 Main PID: 1706 (code=exited, status=0/SUCCESS)

may 09 12:55:26 estudios-srv systemd[1]: Starting Activate Wake On LAN...
may 09 12:55:26 estudios-srv systemd[1]: wol.service: Succeeded.
may 09 12:55:26 estudios-srv systemd[1]: Started Activate Wake On LAN.
You will notice the service is dead or inactive. This is normal because it is not actually a service and it is not running like a daemon, it starts, do whatever it has to do and finishes.
If we restart the server now, our service entry will not run at startup because we haven’t enabled it. To do so:
sudo systemctl enable wol.service
Now, you can restart the server and it will wake remotely because “Wake-on: g” should be already set when it boots.
The explanation to “TRULY sticky”
But, why did I titled my post with a “TRULY sticky”?. Well, the reason is that all the recipes I’ve found to do this didn’t work. After rebooting, always the “d” value was set for the “Wake-on” option.
In fact it is not a problem of executing the configuration or not. Although the service entry run on every reboot, it was doing it before the network card was available to be configured.
So, the problem is when to run the network card configuration.
That’s the reason you should put this line in you .service file:
After=network-online.target
To make sure it configures the network card when it’s really available.
But if you need to check status after execution, get details of the task or any other entity of Qlik Sense (user, app, license, etc) then you have to use a library or package that performs all that kind of funcionality.
I wrote a simple npm package qlik-sense-qrs that can help you to write more complex scripts that will allow you to interact with Qlik Sense in a more efficient way.
The package is available at github and there you will find some basic documentation on how to install and use it.
Basically, all you will need is adding the package to your project
npm install qlik-sense-qrs --save
Once the package and its dependencies are installed you are ready to use it.
You will need a Qlik Server certificate to authenticate to the QRS API. There are some basic directions on how to get your server certificate in the post mentioned above.
Put both files containing the certificate and the key in a secured folder to make sure only your application has access to them.
Initialization
Now you are ready to import and configure the library to access your server from your Node.js application:
const qsqrs = require('qlik-sense-qrs');

//Set an array of options
let options = {
    host: 'https://yourserver:4242/qrs',
    //Path to your server certificates
    certFile: '../../qlik/client.pem',
    certKeyFile: '../../qlik/client_key.pem'
};
//Apply defined configuration
qsqrs.config.apply(options);
console.clear();
//Show the current configuration
console.log(qsqrs.config.getConfiguration());
That is the simplest way to set the connection options: you create an object containing three mandatory parameters and pass it to the apply method of the config object.
The next two lines are optional. They just show the applied configuration to you, like this:
You will notice there are two more parameters that you didn’t specify: xrfKey and certPassword. Let’s explain what they are.
xrfKey: This is a 16 characters long string used to prevent CSFR attacks. The key will be sent in the query string and also as a header of the request. If you don’t specify a key, the library will create a random one for you, but if you want to use your own (can’t imagine a reason) all you have to do is adding it to the configuration object or invoking the specific method to set it:
qsqrs.config.setXrfKey('myownqliksense_k');
certPassword: when exporting your server certificate you can specify a password to improve the security. At the moment of writing this post the library hasn’t implemented this option, but probably in the next version will be available.
You can set and get any of the configuration parameters by using their corresponding method in the config object (qsqrs.config):
There are two different types of objects in the wrapper. All of them are implemented in the entities object.
genericEntity: Most of the objects of QRS API have a get (list or read) endpoint and the structure of the subjacent request is the same for all of them. What the genericEntity does is receiving the name of the Qlik Sense entity as a parameter and perform the requested method. For instance, I don’t know what the odagrequest object is used for, but using the genericEntity object I can perform a call like the following and get some results:
let data = await qsqrs.entities.genericEntity.list('odagrequest');
You can check some more examples in the Github page or inside the test code.
There is an array inside generic-entity.js file that defines which objects you can invoke to:
task: By now, this is the only object that implements a method different of a list or read one. It implements a start method, which is the one we are naming since the first line of this post.
Putting it all together
The example below shows how to search for a task based on its name. Then, retrieve its id to invoke the task and after that it waits for 5 seconds and shows the execution result.
//Initialization
const qsqrs = require('qlik-sense-qrs');
let options = {
    host: 'https://yourserver:4242/qrs',
    //Path to your server certificates
    certFile: '../../qlik/client.pem',
    certKeyFile: '../../qlik/client_key.pem'
};
qsqrs.config.apply(options);
//End of initialization

(async() => {
    try {
        let name = 'My task name';
        console.log('Retrieve task data by name');
        let data = await qsqrs.entities.task.list(`name eq '${name}'`);
        let id = data[0].id;
        console.log(`Task id is ${id}\nStart task specifying its id`);
        data = await qsqrs.entities.task.start(id);
        console.log('Task started. Wait for 5 seconds....');
        await qsqrs.util.wait(5000);
        console.log('Retrieve task data by id');
        data = await qsqrs.entities.task.list(`id eq ${id}`);
        console.log('Show execution / progress result');
        let execData = data[0].operational.lastExecutionResult;
        console.log(`\tStatus:\t${execData.status}\n\tStart:\t${execData.startTime}\n\tStop:\t${execData.stopTime}`);
    } catch (err) {
        console.log(err);
    }
})();
Redmine is probably the best open source ticketing application. We have been using it for some years and had no problem at all.
Though you can define your own workflows and status transitions I miss a feature: automatically closing issues that have been solved during a certain number of days.
There exists a plugin to do so, but if you don’t want to deploy third-party plugins or you just want to customize the way you close the issues, here you have a couple of MySQL Scripts to automate this task (you can program a cron entry for that).
The first script retrieves all the issues ids that have been in solved status during more than the specified number of days
CREATE DEFINER=`root`@`%` PROCEDURE `sp_close_resolved_redmine`(
IN `in_days` INT
)
LANGUAGE SQL
NOT DETERMINISTIC
CONTAINS SQL
SQL SECURITY DEFINER
COMMENT ''
BEGIN
    declare v_id integer;
    declare v_finished bool;
    declare res_issues cursor for
    SELECT id
    FROM redmine.issues
    WHERE status_id = 3
    AND TIMESTAMPDIFF(DAY, updated_on, CURRENT_TIMESTAMP) > in_days;
    declare continue handler for not found set v_finished = true;

    open res_issues;
    res_issues: loop
        fetch res_issues into v_id;
        if v_finished = true then
            leave res_issues;
        end if;
        call sp_cierra_issue_redmine(v_id);
    end loop res_issues;
    close res_issues;
END
The second script is invoked by the one above passing the issue id to be closed
CREATE DEFINER=`root`@`%` PROCEDURE `sp_cierra_issue_redmine`(
                IN `in_id` INT
)
LANGUAGE SQL
NOT DETERMINISTIC
CONTAINS SQL
SQL SECURITY DEFINER
COMMENT ''
BEGIN
    declare v_id            integer;
    declare v_author_id     integer;
    declare v_assigned_to   integer;
    declare v_status        integer;
    declare v_id_journal    integer;

    select author_id, assigned_to_id, status_id into v_author_id, v_assigned_to, v_status
      from redmine.issues
     where id = in_id;

    #Update issue status and assign to author
    update redmine.issues
       set assigned_to_id = v_author_id,
           status_id = 5,
           updated_on = current_timestamp,
           closed_on = current_timestamp
     where id = in_id;

    #Create a new journal for the issue
    insert into redmine.journals (journalized_id, journalized_type, user_id, notes, created_on)
                          values (in_id, 'Issue', 1, 'Automatically closed after 7 days solved', current_timestamp);

    #Get the journal id we have just inserted
    select max(id) into v_id_journal
      from redmine.journals
     where id = in_id;

    #Create two new entries in journal details, one for assigned_id and another one for status_id
    insert into redmine.journal_details (journal_id, property, prop_key, old_value, `value`)
                                 values (v_id_journal, 'attr', 'assigned_to_id', v_assigned_to, v_author_id);

    insert into redmine.journal_details (journal_id, property, prop_key, old_value, `value`)
                                 values (v_id_journal, 'attr', 'status_id', v_status, 5);
END
Since I bought my Ender 3 I have been looking for a hairspray with the minimum odor. I hate the cheap perfume smell floating around in the room where I make things.
I first try the most famous 3D printing hairspray in Spain: Nelly. It doesn’t smell too much, but it does.
A second try was for Mercadona’s “Fuerte” one. It smells better and adhesion is quite good.
I felt very good with this last one, but after some more printings… the room smells like a granny hairstyle contest.
After thinking a lot on it I found a solution. Some years ago I played with pine resin to make a homemade soldering paste. Though the results where satisfying, I stopped using that substance because once diluted in alcohol, when the dissolvent evaporates it remains a surface extremely sticky. That is exactly what I want now for my printing bed: a sticky surface.
Pine resineFinished adherence improver
Today I’ve tried the first formulation with very good results:
Ingredients:
50 grams of Ethylic Alcohol
3 grams of pine resin
The recipe is quite simple. All you have to do is follow the next steps:
Make powder a couple of resin stones (1cm side each one).
Pour the powder and the alcohol in a small bottle, close it and stir until the resin dissolves completely.
It’s done.
Put the resulting liquid into a spray bottle and you have a ready to use adherence improver that doesn’t smell at all.
Buying a second-hand Kinect is a cheap option to get a 3D scanning capable device. Though it is not designed specifically for that purpose it can, using the right application, create a 3D model of an object, a room or a person.
I’ve tried several times to install the XBOX 360 Kinect to my Windows PC with no success, but finally, I’ve made it work.
Xbox 360 Kinect
There is a Windows version of Kinect. It costs about 155€ and I guess it is easier to install on a PC, but I had no intention to expend that money while there are second-hand units for about 20€. A friend of mine bought one for 6€!
What do you need to connect the Xbox device to Windows? You need an adapter that you can order to Amazon and it costs only 12€.
Kinect adapter for PC
The converter just feeds with some extra current to our Xbox Kinect and also adapts the Xbox plug to a standard USB 3.0.
There are no more hardware requirements. All you need is to install the software to make it work, and at that point is where I got in troubles.
If you read the available tutorials on the web, the first step is installing Kinect for Windows SDK and after that connecting your Kinect to any USB 3.0 port. The device should be autodetected and de Kinect devices (camera, audio, and motor) will be shown on the Windows Device Manager.
Instead of that, what I got after installing was this:
Xbox NUI Motor
If this is also your case and you installed the latest version of Kinect for Windows SDK (version 2.0), try the following:
Unplug the Kinect from the USB 3.0 port
Remove the version 2.0 software (It is advisable though I didn’t remove it from my computer)
Install the previous version of Kinect for Windows SDK (version 1.8):
or you can download it from here if it is not available there.
Plug the Kinect again in
The correct drivers will be now installed
Kinect for Windows Devices
What todo do after that?
Try installing Kinect for Windows SDK Toolkit. It contains a lot of utilities and POCs to show the capabilities of Kinect technology for Windows.
Kinect for Windows Developer Toolkit
Scan an object or even yourself to make a 3D printing
Skanect is a very good choice, but the free version only allows exporting a limited number of polygons. Nonetheless, the result is at least curious and you can recognize yourself though you print it using Blue Sky PLA)
Skanect Scanner
Reconstructme is also a good option, though is less straight and I think it is more focussed on making a virtual color model of the object.
Reconstructme while Scanning
Both Recostructme and Skannect will allow you to export a .obj or .stl file and then you can post-process it with the application of your election.
If you are reading this I guess you know what Composer and Packagist are and probably you need to know how to build your own package or you just simply don’t remember all the steps to do it.
Otherwise, you can get some very basic info of Composer here: Wikipedia Composer and if you want to dive into the documentation then you can visit Composer Documentation page. Packagist is the main repository for Composer packages.
Preparation
We will create a package and before writing a line of code, we will compile some basic information. I’m using mine as an example.
Developer name / Organization: pangodream
Package name: str-util
Description: A very simple package
Setting up the project for the package
Create the project folder
In our case, the project folder will be str-util
Create two more folders inside the project one; one for the package code and the other one for testing. The folder structure should be:
str-util
    /src
    /test
Create composer.json file
Access the project folder and create composer.json by typing
> composer init
Composer will try to guess some of the configuration values
Once we confirm the file generation, a composer.json file will be in our project folder and it will contain some very similar to this:
So, this is now the content of our project folder:
str-util
    composer.json
    /src
    /test
Edit to complete composer.json
We will add some information about autoloading (“autoload”) and also tell composer our dependencies (“require”). For instance, which is the minimum version of PHP that our library needs to work.
Inside the composer.json file, we told composer the path were StrUtil package classes are. So, each time we reference in our code a class qualified with its package name Composer will look into the composer.json file to know where that class file is.
In our case, the package name is StrUtil and the class is Counter (because our class will contain some methods to count words, paragraphs, letters, …).
Inside src folder, let’s create a new folder for our package with the name we gave it inside composer.json: StrUtil, and inside that folder, we will place one of our package classes file. Now, we have this folder hierarchy
/str-util
    /src
        /StrUtil
            /Counter.php
So, when PHP finds a reference to a class with the ‘use’, it will look into composer.json. For instance, let’s say we have a line of code like this
use StrUtil\Counter;
What composer.json file indicates is that StrUtil package is under src folder
"autoload": {
        "psr-0": {
            "StrUtil": "src/"
        }
    }
So, the Counter.php file containing the Counter class code should be located in
src/StrUtil/Counter.php
Now we know how the class file is located and loaded, let’s write down the code:
<?php
/**
 * Created by Pangodream.
 * Date: 14/04/2019
 * Time: 18:50
 */

namespace StrUtil;


class Counter
{
    /**
     * @param string $text The text we want to count the number of words it consist of
     * @return int The number of words in text
     */
    public static function countWords(string $text){
        /** @var int $count To store the result of counting words in text */
        $count = 0;
        //Clean up the string
        $text = trim($text);
        /** @var array $words Array containing the words */
        $words = explode(" ", $text);
        //Array size is the number of words in text
        $count = sizeof($words);
        return $count;
    }
}
And now we know how to reference that class, let’s create a test file to verify that our class works. We will name this file testStrUtil.php and save it inside the test folder we created before:
str-util
    /test
        /testStrUtil.php
<?php
/**
 * Created by Pangodream.
 * Date: 14/04/2019
 * Time: 19:03
 */

//Use composer autoload to load class files
require_once __DIR__ . "/../vendor/autoload.php";

//Required package/libraries
use StrUtil\Counter;

$text = "Aequam memento rebus in arduis servare mentem";
$wordCount = Counter::countWords($text);
echo "The txt contains ".$wordCount." word(s)\r\n";
Testing our package
From the str-util folder, we are going to invoke the test PHP file and see what happens:
str-util> php test/testStrUtil.php
The text contains 7 word(s)
Our package containing only a class is working and now we are ready to publish it.
Repository part: github.com
The next thing we’ll do is creating a new repository with our GitHub account.
Create the repository at github.com
Go to github.com and create a new repository called str-util. It is a good practice to give a repository description and also initialize with a README file. Because you are going to share the package in packagist.org you need to Add a license file, in our case an MIT License.
Add package files to the repository
Now we will make an initial commit to our repository with the files we already have created inside the src folder.
From the str-util folder, execute the following commands:
---->str-util> git init
Initialized empty Git repository in C:/cli/str-util/.git/

---->str-util> git add src
---->str-util> git add composer.json

---->str-util> git commit -m "Initial commit"
[master (root-commit) af7bbac] Initial commit
 2 file changed, 28 insertions(+)
 create mode 100644 src/StrUtil/Counter.php
 create mode 100644 composer.json

---->str-util> git remote add origin https://github.com/YOUR_USER_NAME/str-util.git

---->str-util> git pull origin master --allow-unrelated-histories
From https://github.com/YOUR_USER_NAME/str-util
 * branch            master     -> FETCH_HEAD
Merge made by the 'recursive' strategy.
 README.md | 2 ++
 1 file changed, 2 insertions(+)
 create mode 100644 README.md

---->str-util> git push origin master
fatal: HttpRequestException encountered.
   Error al enviar la solicitud.
Username for 'https://github.com': YOUR_USER_NAME
Password for 'https://YOUR_USER_NAME@github.com':
Counting objects: 7, done.
Delta compression using up to 4 threads.
Compressing objects: 100% (4/4), done.
Writing objects: 100% (7/7), 928 bytes | 309.00 KiB/s, done.
Total 7 (delta 0), reused 0 (delta 0)
To https://github.com/YOUR_USER_NAME/str-util.git
   16f9ce1..8f91cfa  master -> master
Let’s analyze what we have done:
git init
Initialize the Git repository in our local directory. Git will create its hidden files to control operations made on the repository.
git add src

git add composer.json
We are telling Git which files we want to add to the repository. In our case only the src folder and the composer.json file will be synchronized, the rest of the files will stay only in our local machine.
git commit -m "Initial commit"
Our first Initial commit to our local instance of the repository. We haven’t sent anything to github.com until now.
Now we will add an origin (origin means remote repository) to our local repository. This is the reference to our github.com repository. Replace YOUR_USER_NAME with your own Github user name.
If at this point we try to push (send to remote) the commit we made locally, an error will occur because in the remote instance of the repository there are files that don’t exist locally (README file for instance). We cannot send and receive at the same time under normal circumstances, so we will first pull files from origin ignoring possible conflicts:
Now, the README file is in our local repository as well. Now, we can push the commit we made before without any conflicts.
git push origin master
If we take a look to our Github repository, a new folder src should be created and inside it a file named Counter.php
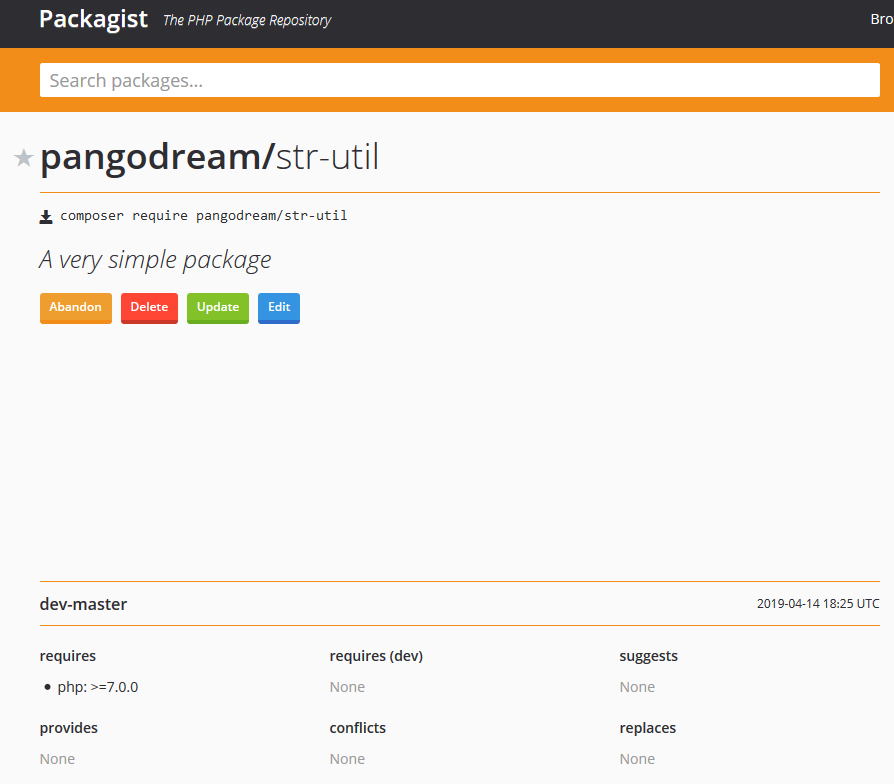
Publishing part: packagist.org
If everything went right, our package is available at Github and ready to be published on Packagist.
Log with your credentials (or using Github) into Packagist.
On the upper right corner, you will find a Submit button. Click on it and a new screen, titled “Submit package” will open.
Copy the URL of your Github repository and paste it inside the text box under “Repository URL (Git/Svn/Hg)”. Your URL should be something like this
https://github.com/YOUR_USER_NAME/str-util
Now press the big green button Check and if our package is OK, the button caption will change to Submit.
Press the Submit button and a new screen, showing the results will appear.
Our published package
Now you have a new package published in Packagist and anyone who wants to use it only has to type in its project folder:
composer require YOUR_USER_NAME/str-util
In a separate post, we will see how to include our new package in a project and invoke the test function we have created.
This website uses cookies to improve your experience. We'll assume you're ok with this, but you can opt-out if you wish.AcceptReject
Privacy & Cookies Policy
Privacy Overview
This website uses cookies to improve your experience while you navigate through the website. Out of these, the cookies that are categorized as necessary are stored on your browser as they are essential for the working of basic functionalities of the website. We also use third-party cookies that help us analyze and understand how you use this website. These cookies will be stored in your browser only with your consent. You also have the option to opt-out of these cookies. But opting out of some of these cookies may affect your browsing experience.
Necessary cookies are absolutely essential for the website to function properly. This category only includes cookies that ensures basic functionalities and security features of the website. These cookies do not store any personal information.
Any cookies that may not be particularly necessary for the website to function and is used specifically to collect user personal data via analytics, ads, other embedded contents are termed as non-necessary cookies. It is mandatory to procure user consent prior to running these cookies on your website.