Xiaomi Mi Smart is a digital scale with BLE interface. This allows it to broadcast your weight to any device like your smart phone and incorporate the measurements to an application like Samsung Health.
Xiaomi Mi Smart Scale
Two years ago I was trying to read BLE messages from an ESP32, but Arduino BLE libraries didn’t work very well at that moment and all I got were some headaches. I wasn’t even able to match the Weight Measurement remote characteristic, so once the ESP32 connected to the scale it wasn’t able to implement the callback functions.
Today I’ve tried again, and I made it work!!!
Calculate the UUIDs
I have used the BLE_Client example (under ESP32 dev board samples). In order to connect and read values from any device you need two unique identifiers (16 bit UUID alias):
where the Bluetooth_Base_UUID is 1000800000805F9B34FB (00000000-0000-1000-8000-00805F9B34FB)
In our case we will be using the string version of the 128bit uuid and that means all we have to do to calculate the long uuid for the service and the characteristic is concatenating the uuids (aliases and Bluetooth Base one) in the following way:
Service UUID: 0000181D-0000-1000-8000-00805F9B34FB
Bring your Xiaomi scale next to your ESP32 MCU and load the next sketch using Arduino IDE:
/**
 * An ESP32 BLE client to find Xiaomi Mi Smart weight scale
 * Author Pangodream
 * Date 2020.05.31
 */

#include "BLEDevice.h"
//Base UUIDs
//Weight Scale service
static BLEUUID srvUUID("0000181d-0000-1000-8000-00805f9b34fb");

/**
 * Callback class for each advertised device during scan
 */
class deviceCB: public BLEAdvertisedDeviceCallbacks {
 //Called on each advertised device
  void onResult(BLEAdvertisedDevice advertisedDevice) {
    // We have found a device, let us now see if it contains the service we are looking for.
    if (advertisedDevice.haveServiceUUID() && advertisedDevice.isAdvertisingService(srvUUID)) {
      if(advertisedDevice.getName() != "MI_SCALE"){
        Serial.print("Weight scale (no MI_SCALE) device found with address ");
        Serial.print(advertisedDevice.getAddress().toString().c_str());
        Serial.print(" and name ");
        Serial.println(advertisedDevice.getName().c_str());
      } else {
        Serial.print("Xiaomi Mi Smart weight scale found with address ");
        Serial.println(advertisedDevice.getAddress().toString().c_str());
        BLEDevice::getScan()->stop();
        Serial.println("End of scan");
      }
    } else {
      Serial.print("Non weight scale device found with address ");
      Serial.println(advertisedDevice.getAddress().toString().c_str());
    }
  }
};

void setup() {
  Serial.begin(115200);
  Serial.println("Devices scan");
  BLEDevice::init("");
  BLEScan* pBLEScan = BLEDevice::getScan();
  pBLEScan->setAdvertisedDeviceCallbacks(new deviceCB());
  pBLEScan->setInterval(1349);
  pBLEScan->setWindow(449);
  //Set active scan
  pBLEScan->setActiveScan(true);
  //Scan during 5 seconds
  pBLEScan->start(5, false);
}

void loop() {

  delay(1000);
}
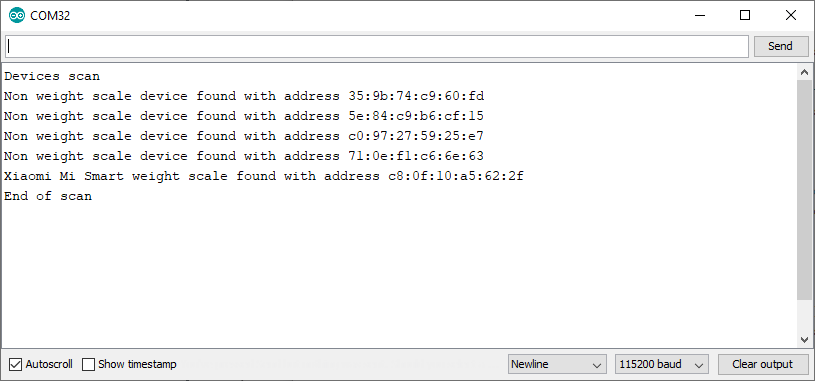
The sketch starts an active scan to find all the BLE servers (devices) that are advertising themselves at that moment.
The scan results are shown at the Serial Monitor (115200 bauds) and if a Xiaomi Mi Smart scale is found (and its name is MI_SCALE) something like the next should appear in your monitor:
If your weight scale was present in the scan and you can read the message “Xiaomi Mi Smart weight scale found with address xx:xx:xx:xx:xx:xx” then you can continue with our next goal, which is to retrieve data from weight measurement.
Retrieving data
When the ESP32 is scanning for devices, it only reads the service beacons sent by each BLE server to advertise itself, but when we use the scale and it broadcasts the calculated weight, it doesn’t send the same type of message (it is not a service message, but a characteristic one).
Note that we haven’t used yet the characteristic UUID we calculated before and we’ve only used the service one.
Let’s load a new sketch into the ESP32 MCU to retrieve some data from the characteristic:
/**
 * An ESP32 BLE client to retrieve data from the Weight Measurement characteristic
 * of a Xiaomi Mi Smart weight scale
 * Author Pangodream
 * Date 2020.05.31
 */

#include "BLEDevice.h"
//Base UUIDs
//Weight Scale service
static BLEUUID srvUUID("0000181d-0000-1000-8000-00805f9b34fb");
//Weight Measurement characteristic
static BLEUUID chrUUID("00002a9d-0000-1000-8000-00805f9b34fb");

static BLEAdvertisedDevice* scale;
static BLERemoteCharacteristic* remoteChr;
static boolean doConnect = false;
static boolean connected = false;
static int year = 0;

/**
 * Callback function for characteristic notify / indication
 */
static void chrCB(BLERemoteCharacteristic* remoteChr, uint8_t* pData, size_t length, bool isNotify) {
    //Console debugging
    Serial.print("Received data. Length = ");
    Serial.print(length);
    Serial.print(". - Data bytes: ");
    for(int i =0; i< length; i++){
      Serial.print(pData[i]);
      Serial.print("  ");
    }
    Serial.println(" ");
    //End of console debugging

    //Parsing the received data and calculate weight
    boolean temporary = true;
    int rcvdYear = pData[3];
    //If we received a year for the first time, store it in the year variable
    //The first year we receive indicates a temporary measurement
    if(year == 0){
      year = rcvdYear;
    }else{
      //If year has been previously defined and the year we have received is
      //greater than it, then the measurement is not temporary, is the final one
      if(rcvdYear > year){
        temporary = false;
      }
    }
    double weight = 0;
    weight = (pData[1] + pData[2] * 256) * 0.005;

    Serial.print("Weight: ");
    Serial.print(weight);
    Serial.print(" Kg - ");
    if(temporary){
      Serial.println(" (Provisional)");
    }else{
      Serial.println(" (Definitive)");
    }
}

/**
 * Callback class for each advertised device during scan
 */
class deviceCB: public BLEAdvertisedDeviceCallbacks {
 //Called on each advertised device
  void onResult(BLEAdvertisedDevice advertisedDevice) {
    // We have found a device, let us now see if it contains the service we are looking for.
    if (advertisedDevice.haveServiceUUID() && advertisedDevice.isAdvertisingService(srvUUID)) {
      if(advertisedDevice.getName() != "MI_SCALE"){
        Serial.print(".");
      } else {
        Serial.println("  Found!");
        BLEDevice::getScan()->stop();
        Serial.println("Stopping scan and connecting to scale");
        scale = new BLEAdvertisedDevice(advertisedDevice);
        doConnect = true;
      }
    } else {
      Serial.print(".");
    }
  }
};
/**
 * Callback class for device events
 */
class ClientCB : public BLEClientCallbacks {
  void onConnect(BLEClient* pclient) {

  }

  void onDisconnect(BLEClient* pclient) {
    Serial.println("Disconnected. Reconnecting...");
    connected = false;
  }
};

bool connectToScale() {
    Serial.println("Stablishing communications with scale:");
    BLEClient*  pClient  = BLEDevice::createClient();
    Serial.println("    BLE client created");

    pClient->setClientCallbacks(new ClientCB());

    // Connect to the remove BLE Server.
    pClient->connect(scale);
    Serial.println("    Connected to scale");

    // Obtain a reference to the service we are after in the remote BLE server.
    BLERemoteService* pRemoteService = pClient->getService(srvUUID);
    if (pRemoteService == nullptr) {
      Serial.println("    Error: Failed to find service");
      pClient->disconnect();
      return false;
    }
    Serial.println("    Service found");

    remoteChr = pRemoteService->getCharacteristic(chrUUID);
    if (remoteChr == nullptr) {
      Serial.print("    Failed to find characteristic");
      pClient->disconnect();
      return false;
    }
    Serial.println("    Characteristic found");
    Serial.println("    Setting callback for notify / indicate");
    remoteChr->registerForNotify(chrCB);
    return true;
}

void setup() {
  Serial.begin(115200);
  Serial.println("Searching for MI_SCALE device");
  BLEDevice::init("");
  BLEScan* pBLEScan = BLEDevice::getScan();
  pBLEScan->setAdvertisedDeviceCallbacks(new deviceCB());
  pBLEScan->setInterval(1349);
  pBLEScan->setWindow(449);
  //Set active scan
  pBLEScan->setActiveScan(true);
  //Scan during 5 seconds
  pBLEScan->start(5, false);
}

void loop() {
  if(doConnect && !connected){
    connected = connectToScale();
  }
  delay(1000);
}
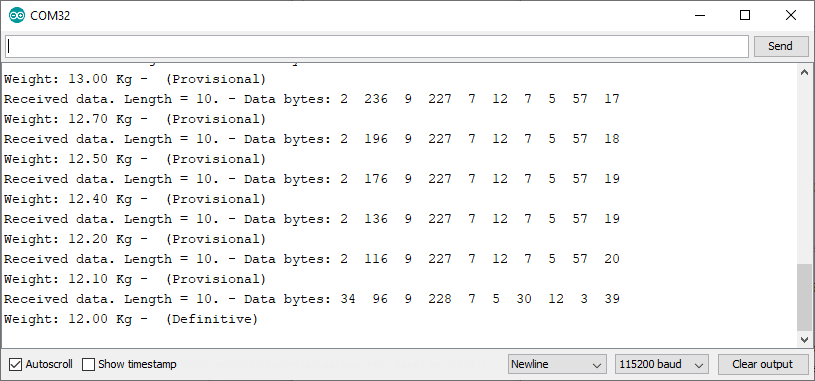
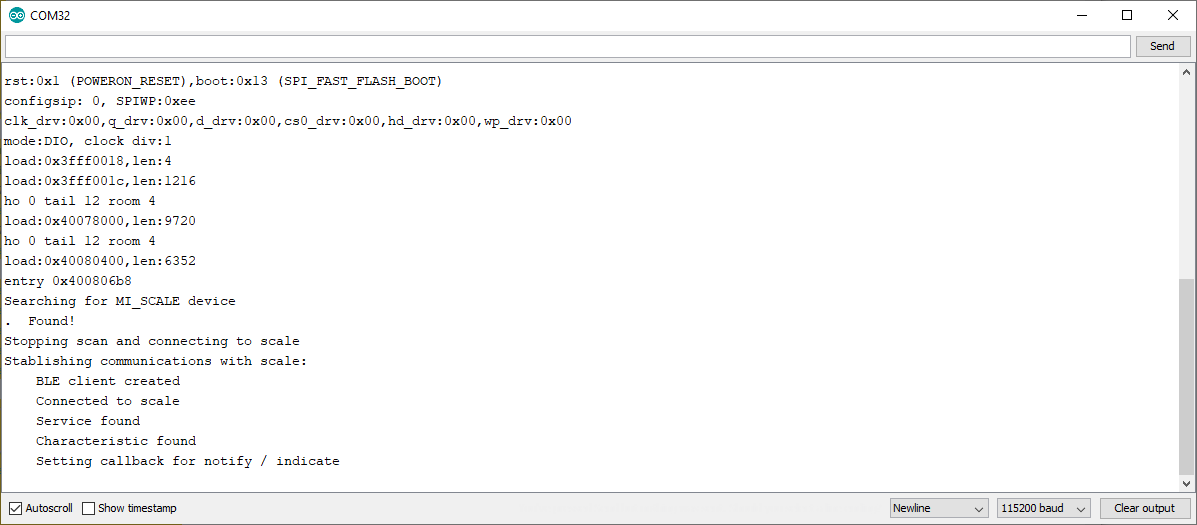
Reboot the MCU and take a look to the serial monitor. If everything goes right, something similar to this should be shown:
The sketch performs these tasks:
Scan devices to find the Xiomi scale
Connects to the scale
Search for the Weight Scale service
Instantiates the service
Search for the remote characteristic
Instantiates the remote characteristic
Sets the callBack function for the characteristic
In this way, when the scale begins to measure weight, our callback function will be invoked receiving the data.
At this point, the ESP32 is waiting to receive something in the callBack function. Put some weight over the scale and you should see the provisional and definitive measurements at the serial monitor.
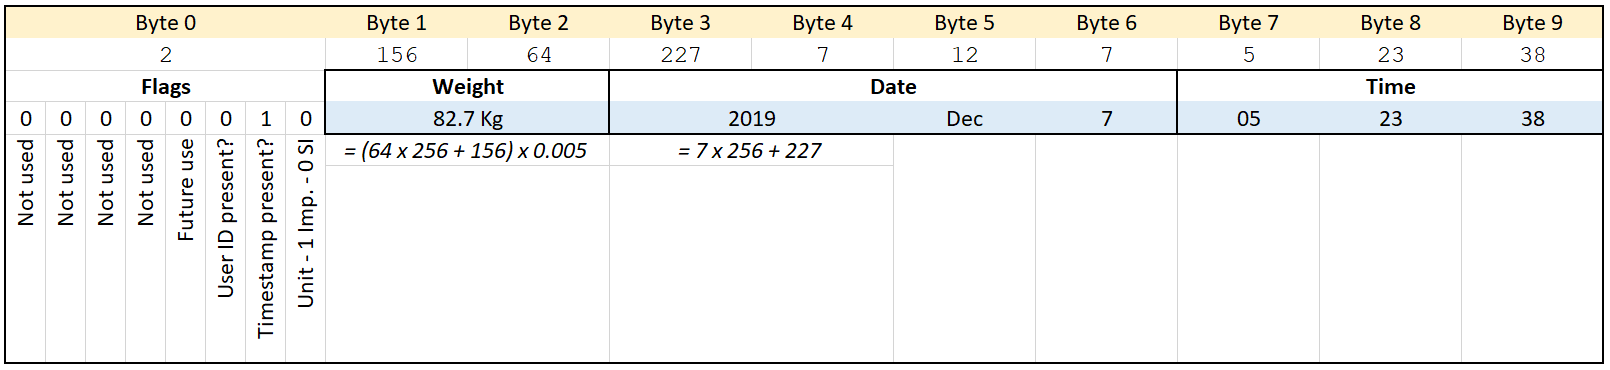
The callback function always receive 10 bytes of information. These bytes can be parsed to get the weight and timestamp values in the following way:
Parsing the XIOMI Scale BLE data
The way we can differentiate between the provisional and the definitive measurements is looking at the year in the timestamp. While measurements are provisional, the scale sends a fake year and not the current one. So, all we hve to do is taking note of the value for the year in the first data packet we receive and then compare to the rest of the years we receive.
When the received year is greater than the first year we received that is the definitive measurement and we can get the calculated weight.
Why BLE_client sketch doesn’t work
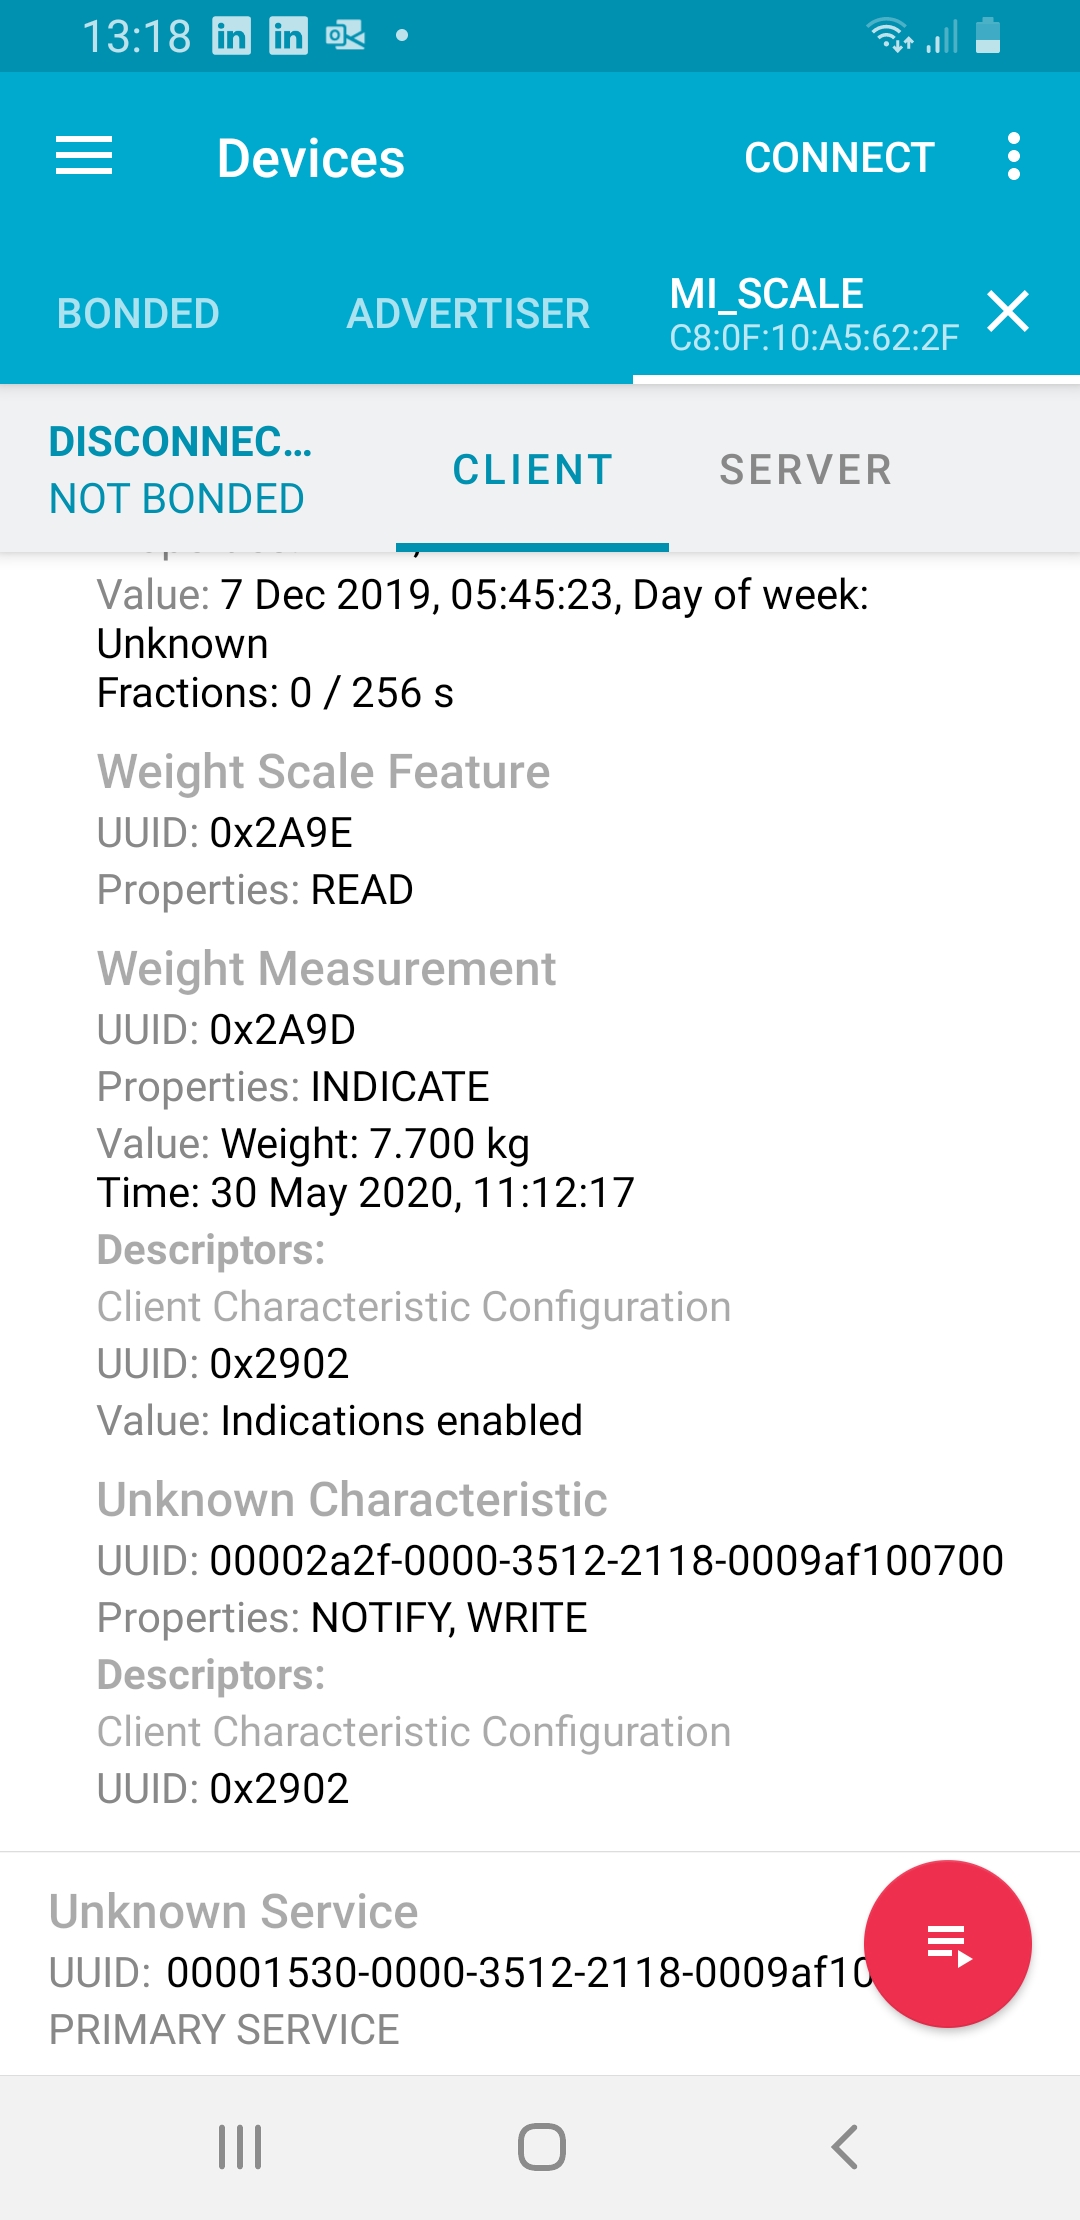
If yoy try the sketch located at File / Examples / ESP32 BLE Arduino / BLE Client it won’t work and will not receive any chararteristic message even when you change the UUIDs.
To set the callback function for the remote characteristic, first it checks the characteristic can be notifiable (method canNotify()) and our characteristic is not.
If you study the BLE connection using any app for that purpose (I use nRF Connect from Nordic Semiconductor) you will notice that the characteristic we are using is not notifiable but ‘indicate’ type:
So, if you comment out the condition to avoid checking if the characteristic is notifiable or not, and set the callback function anyway, you will received calls in the callback function with the parameter isNotify set to false.
Some 3D print jobs may take hours to finish. When printing to an Ender 3 (and I guess there are other printer models with the same issue) even if the job has finished, the printer stays on and the power module fans continue running. If this happens during night hours, it means a noise that we can avoid easily.
We have a lot of possibilities to achieve our goal, but I don’t want to plug any wire to the Raspi GPIO to control a relay board. I instead used a Sonoff Switch to control a standard multiplug.
We will cover only the switching solution assuming that you have already your Octoprint system connected to your printer and working.
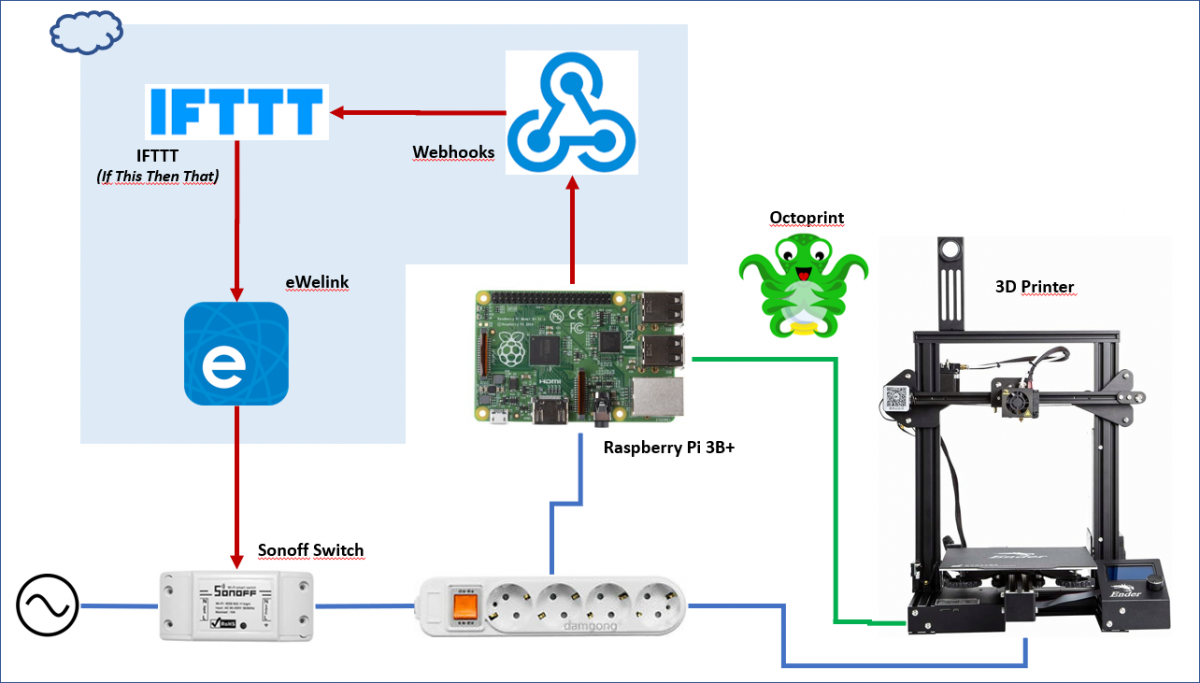
The solution will perform the next steps to switch off the printer and the Raspi:
The printing job will run as usual.
When the job is completed, Octoprint will check for any event listener already configured (in config.yaml file)
Our event configuration will trigger a system command consisting of a Wget to contact to Webhools
Webhooks will notify IFTTT about the finished printing job
IFTTT will take into account (with a programmed filter) the time when the event occurs to switch off (or not) the Sonoff Switch
IFTTT will send a message to eWelink platform to switch off the device
eWelink platform will tell our device to switch off
Though it seems there is a lot of work to do, you’ll see it’s quite easy to set up everything and most of the steps are performed in the background by IFTTT platform.
List of components
IFTTT account: you can use your Google account to log in
This step is quite easy. All you have to do is cutting the multiplug wire to insert the Sonoff switch in it. Be aware that Sonoff switch has an input and an output.
There are a bunch of videos and tutorials about how to do this.
2.- Set up your Sonoff Switch
Use the app installed on your Android phone to set up the switch. Just to clarify how the Sonoff switch works take into account these next points:
The switch connects to your Wifi router:
All the communication occurs between the switch and eWelink server. You cannot (unless you reprogram the switch board) communicate directly to it through your LAN.
To set up the switch using its App, you have to be connected to the same Wifi network at the moment of setup. This point is very important because you may have two wifi networks at home (one for 2.4GHz devices and another one for 5GHz) and probably you connect your mobile to 5GHz one. If you don’t connect to 2.4GHz at the moment you configure your switch you will be telling your device to connect the network you are in and it will not be able to connect to that 5GHz wifi. It is only capable to connect to 2.4GHz AP, so please before configuring the device connect your mobile to your 2.4GHz wifi AP. This is only for during setup process. Once the device is configured you can return your mobile to your 5GHz wifi.
Once the Sonoff device is configured, you have several alternatives to switch it on/off:
Using eWelink App
Using Google Assistant
Using IFTTT (If This Then That) platform. And this will be our choice for this solution.
Just in case you have any issue while reproducing the activation steps shown in the video, here you have the official link to the eWelink setup process.
At this point, you should be able to switch on/off your device by using eWelink App on your Android phone. If you are not, please do not continue beyond this point and review all the configurations.
3.- IFTTT Applet Set up
Now you have your device reachable in the cloud it’s the moment to create an applet in IFTTT. You will use a free account and some of the characteristics of your applet are premium, so you will be limited and you will not be able to publish your applet for others and it will just be available for you. That’s no problem at all.
Log into IFTTT with your account (or even better use your Google one) and then follow the steps shown in the next video:
The applet is now available and you can invoke it in two different ways:
A GET request: from any browser, CURL, WGET, etc
A POST request: and optionally specifying a JSON body with additional data (a security token for instance)
We will use the first option now.
The first thing is to find the key to invoke Webhooks. That key is generated automatically by the platform and it can be easily changed on demand.
To find it, follow the steps shown in the video, then copy it down:
So, at this point, we have everything to invoke our applet:
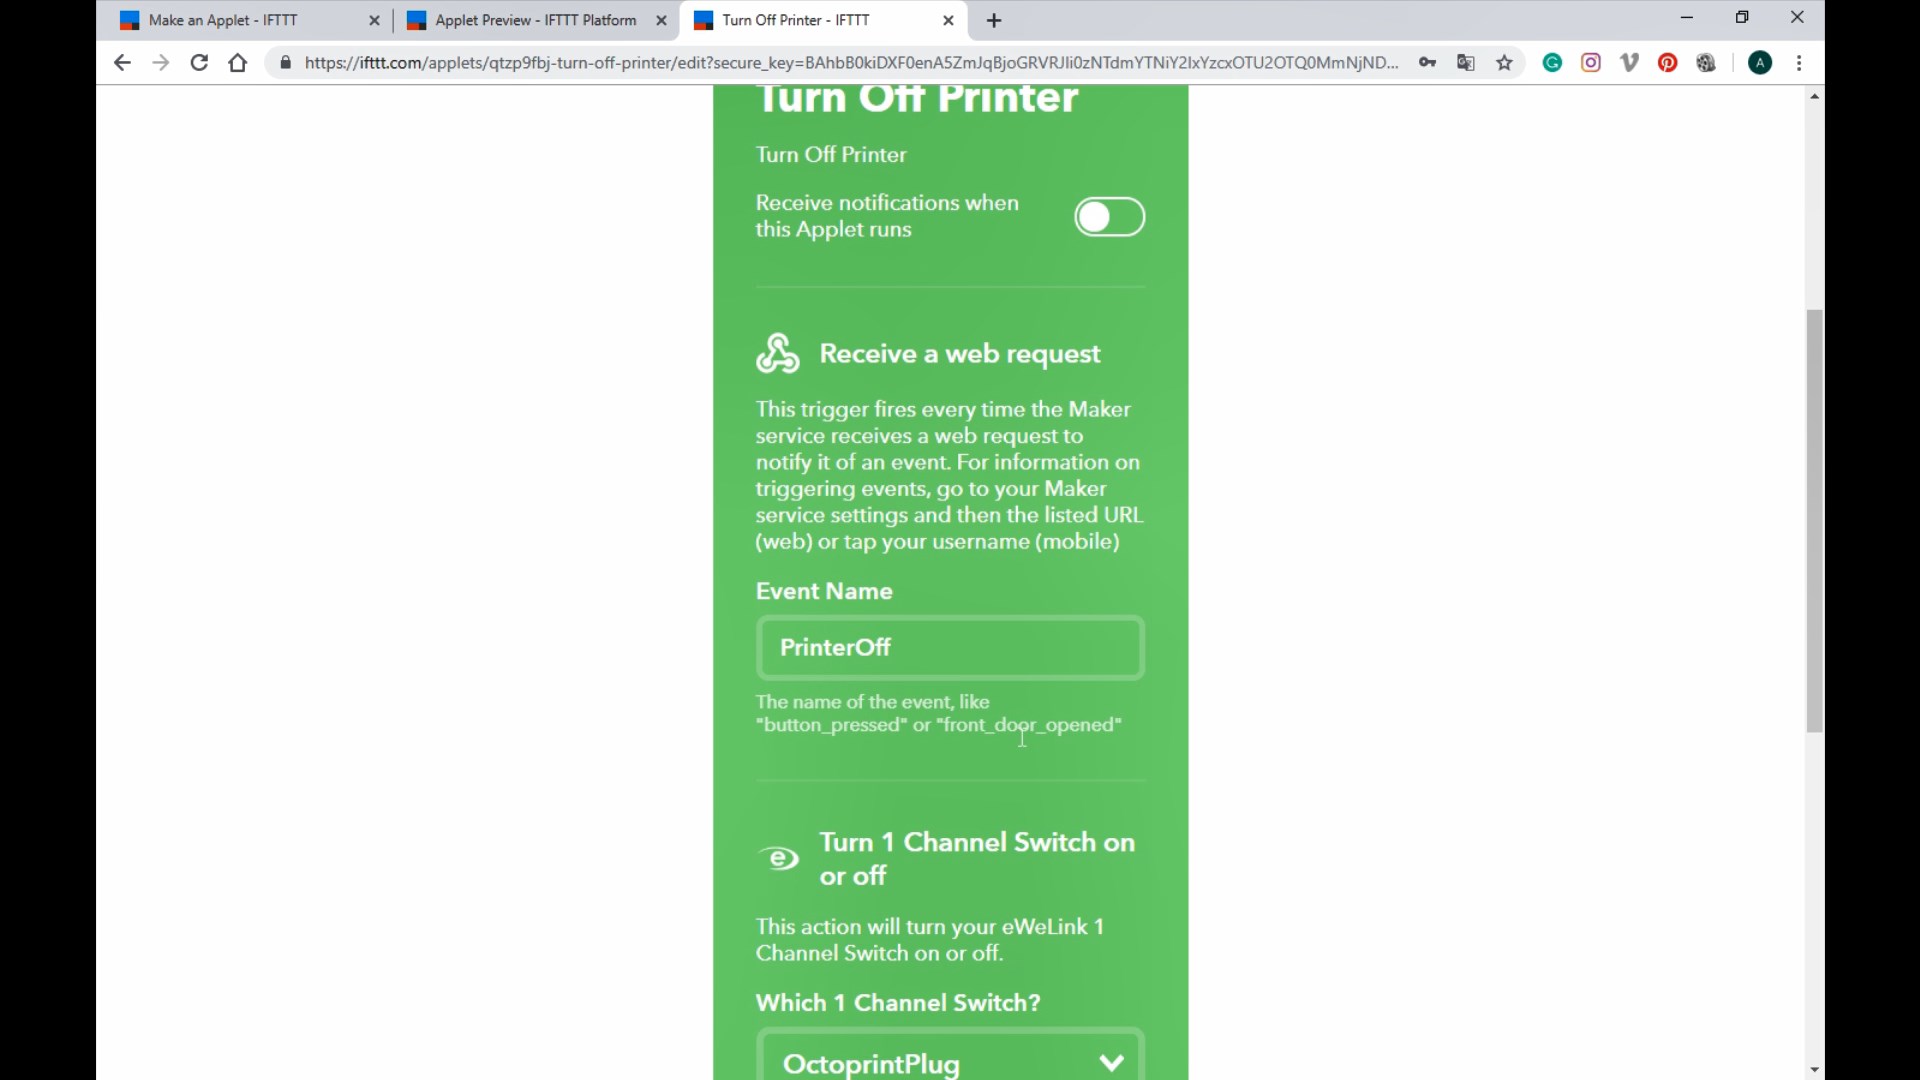
Event Name: PrinterOff
Webhooks Key: your_webhooks_account_key
Remember the Event Name is not the Applet Name, but the name you specified when you activated the applet:
Replace the key with the value assigned to your account, copy the full URL and paste it on any browser.
If everything goes right you will receive a reply like this
Congratulations! You've fired the PrinterOff event
Change the key value and the response will be an error, but take care because if you change the event name, though it doesn’t exist, it will reply with a success message. So, if you see everything seems to work but the applet seems to be not invoked review the event name in the URL.
4.- Add two applets to control the printer manually (OPTIONAL)
We have an applet that we will use to switch off our printer from Octoprint when a print job is done, but we need to use the eWelink application to switch on/off the printer.
To make things easier, we can add two more applets. Do not modify the one we’ve just created as we will use it after.
Following the shown steps in two videos above, create and activate these two applets:
Applet 1:
On New applet screen
Trigger: Webhooks
Applet Name: ManPrinterOn
Applet Description: Manually switch on the 3D printer
Action: eWeLink
On Enabling Screen
Event Name: ManPrinterOn
Which channel: yourDeviceName
On/Off: ON
Applet 2:
On New applet screen
Trigger: Webhooks
Applet Name: ManPrinterOff
Applet Description: Manually switch off the 3D printer
Action: eWeLink
On Enabling Screen
Event Name: ManPrinterOff
Which channel: yourDeviceName
On/Off: OFF
With our two new applets, we can switch on/off our printer from any browser. To make this task easier, we will create two batch files (if you are a Linux user it will be easy to transform the Windows .bat files)
Install Wget for Windows. The easiest way is to download the installer from SourceForge: Wget for Windows
Create a folder inside your user folder named scripts.
Create two .bat files inside the scripts folder and adapt the content of the files to your Ids, Keys, etc.
echo off
wget https://maker.ifttt.com/trigger/YOUR_EVENT_NAME/with/key/YOUR_WEBHOOKS_KEY -O /dev/null
Both files are the same thing when invoking IFTTT platform and just change the event name (to switch on or off), but the first file, additionally will wait for 45 seconds and open a Chrome instance with the Octoprint URL. Change this to adapt to your configuration or simply remove these lines if you don’t want Octoprint to be invoked automatically when switching on your printer.
Add to direct links to these files to your desktop and all you have to do to switch on or off your printer is double-click on them.
5.- Make applet conditioned to time
Probably you will want your system not turning off each time a print job is finished. Imagine you want to send two or more short jobs to your printer manually.
To prevent this from happening we are going to make our Applet conditioned to time using the Filtering capabilities of IFTTT. This is the premium feature I told you before, but you can use it for your own Applets (you cannot publish them to be used by others).
Coding a filter for an IFTTT Applet is quite easy. It uses Javascript and standard libraries.
To implement our filter all you have to do is deciding what time do you consider the limit when the printer should be turned off automatically. In my case, I chose between 23:00h and 08:00h, because I never print something beyond that time and wait for it to finish.
Here you have a video showing the necessary steps and how to reach the Logging Screen to check if your applet is running ok. Take note that the video doesn’t show exactly the same code as the one mentioned above.
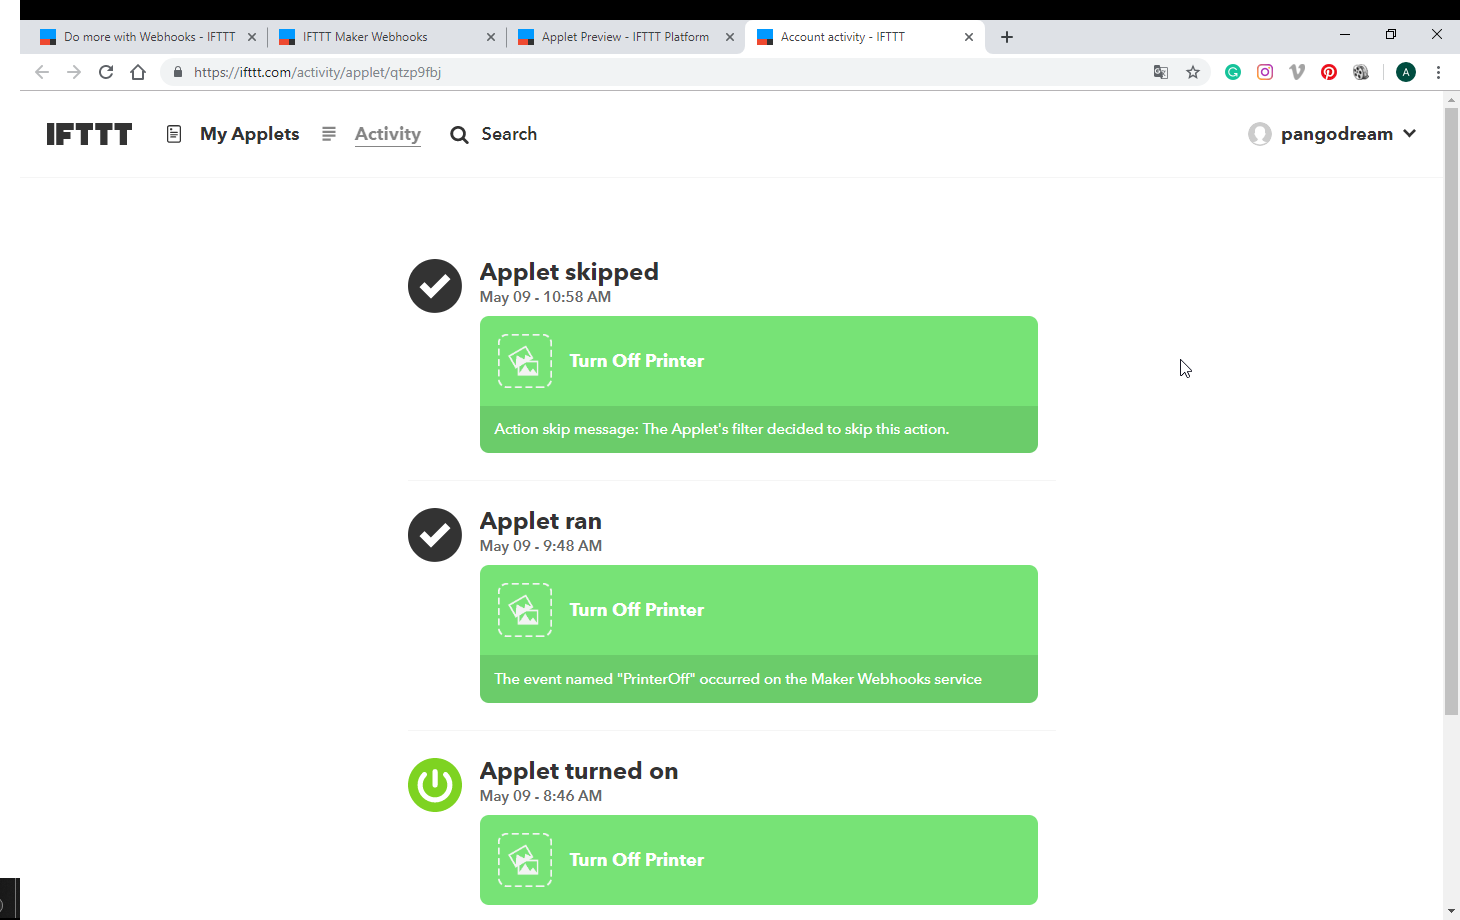
Now, if you invoke your applet from a browser and the limit time you configured in the code has not been reached, the applet execution should be skipped. You can check it in the logging screen and may show something like this:
IFTTT Applet event skipped
6.- Configure event in Octoprint
We need to tell Octoprint what to do when a PrintDone event occurs.
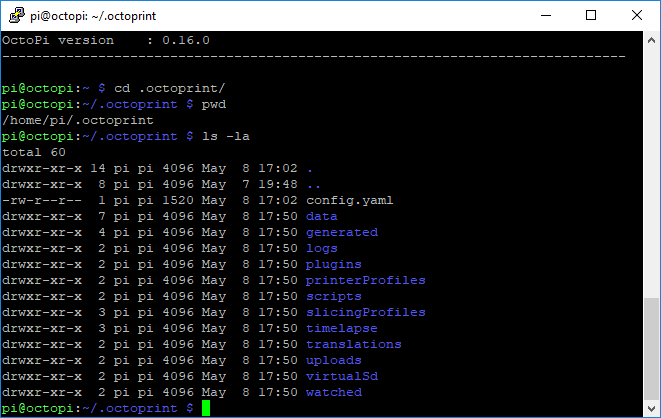
Locate the config.yaml file on your Octoprint installation. If you are using a Raspberry Pi it will probably be here:
Octoprint config.yaml file
Edit the configuration file using your favorite editor and add the following lines to the end of the file.
Replace YOUR_EVENT_NAME and YOUR_WEBHOOKS_KEY with the correct values you obtained in previous steps.
Now, when Octoprint finishes a job, it will invoke your IFTTT Applet and if it occurs after the time you configured in the Applet filtering it will switch off your printer and Raspi.
This website uses cookies to improve your experience. We'll assume you're ok with this, but you can opt-out if you wish.AcceptReject
Privacy & Cookies Policy
Privacy Overview
This website uses cookies to improve your experience while you navigate through the website. Out of these, the cookies that are categorized as necessary are stored on your browser as they are essential for the working of basic functionalities of the website. We also use third-party cookies that help us analyze and understand how you use this website. These cookies will be stored in your browser only with your consent. You also have the option to opt-out of these cookies. But opting out of some of these cookies may affect your browsing experience.
Necessary cookies are absolutely essential for the website to function properly. This category only includes cookies that ensures basic functionalities and security features of the website. These cookies do not store any personal information.
Any cookies that may not be particularly necessary for the website to function and is used specifically to collect user personal data via analytics, ads, other embedded contents are termed as non-necessary cookies. It is mandatory to procure user consent prior to running these cookies on your website.